Welcome to Linux InstallFest!

Welcome to our guide on getting Linux up and running!
This is a step-by-step guide, with detailed explanations on how to install Linux, start with the README section, then check out the Install Methods page to find which way of installing Linux suits you best, make sure you carry out the pre-install checks and away you go!
If you're new to Linux and this is your first time installing it, we would recommend you go for an Ubuntu dual boot setup. Ubuntu is stable and a dual boot will help you learn the Linux environment, whilst keeping your Windows install intact.
This isn't meant to be an entirely standalone guide, however, it should be a pretty good collection of our understanding of how to install Linux. We use it for the yearly InstallFest event, but it's available all year-round 🙂
You will need to have a phone/tablet to read the guide.
Don't forget to backup any important data you don't want to lose!
For technical questions about Linux and support after install, join the #help-and-questions channel in the AFNOM Discord.
Enjoy and welcome to the world of Linux! 🥳
Also: Special shoutout to UoB's "Missing Semester" which is a talk series members of AFNOM and CSS run which will cover a lot about how to use your new linux system! Please register and join us!
README before anything else!
Introduction
The Linux InstallFest is a guided session where UoB students from AFNOM and CSS help other students install Linux on their personal computers. A few key points.
-
After the in-person InstallFest, a Discord channel will be shared for troubleshooting / asking followup questions.
-
InstallFest is a way of introducing people to Linux, and as such we aim not to overwhelm people with information as that would do them a disservice. To that end, this is a very streamlined process which is by nature overly simplified. If you want to explore further on your own you're more than welcome to!
-
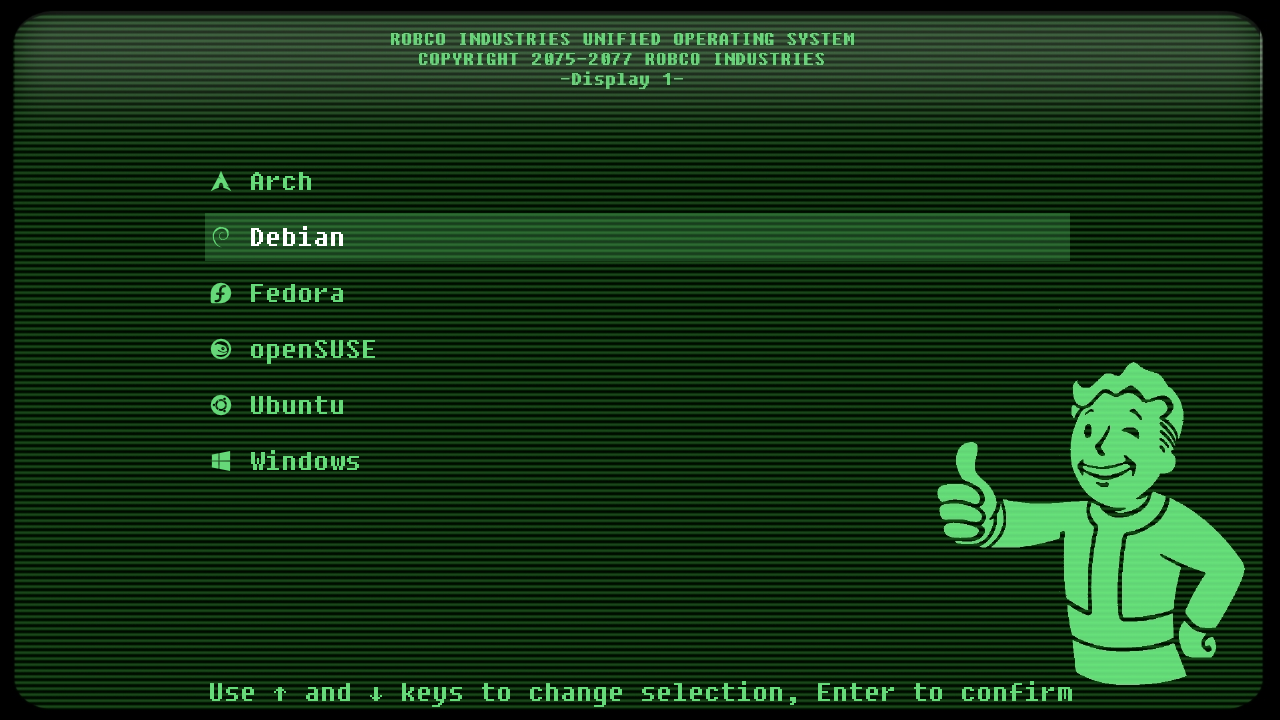
Choosing a Distribution: Much ink (eg here and here) has been spilled on how to choose the right Linux distribution. Linux is extremely customizable and different distributions offer different combinations of software versions, update schedules, startup mechanisms, security features, graphical environments etc etc. In particular, the graphical environment might actually be more important than the distribution in terms of how you interact with the OS. However, per the prior point, we strongly recommend using Ubuntu Linux for the InstallFest, especially if you've never used Linux before or are a beginner.
PLEASE NOTE
There are many different Linux distributions and graphical environments to try; we certainly don't discourage people from exploring what's out there. But for the purposes of helping the most people in parallel, we're only going to include instructions for Ubuntu in this document.
Install Modes
A key choice to be made is how to install Linux; briefly:
- As a Virtual Machine (VM)
- Your Linux installation runs alongside / on top of your existing operating system.
- This is the least disruptive to the system but often has bad performance and experience.
- Replacing the existing OS entirely
- Get rid of Windows and run Linux exclusively.
- Set to 'dual boot' with your existing OS
- Choose at startup whether to boot into Windows or Linux.
- A nice compromise between the first two options.
- Using Windows Subsystem for Linux (WSL)
- Similar to a VM.
- Better performance, better windows integration, but you need to use the terminal.
More information is available about these choices in the install methods section.
Depending on which you choose, you'll want to follow slightly different parts of the guide. Note also that there's a special section for Apple Silicon Macs.
Recommendation
Our recommendation (for PCs) is to go for dual boot or full install over setting up a VM:
- A slow clunky VM doesn't paint any OS in a good light
- VMs yield an inferior Linux experience (but with better safety)
- Based on last year, setting up a VM seems just as complicated as setting up dual boot!
- Having to boot into Linux will help force you to get accustomed to it
Preinstall Checklist
Regardless of which method you choose, you'll want to do the following time consuming steps before the InstallFest. In previous years, people have not done these steps ahead of time and then spent most of the InstallFest doing this prep work!
- Skim the guide you'll be following
- If you are at InstallFest in person then we will provide pre-flashed USB sticks so you don't need to download or flash anything!
- If you want to use your own USB or are following this at home:
- Download the installation media for Ubuntu
- If you are installing Linux as a replacement OS or via dualboot
- You will also need a USB drive of at least 8 GB
- A drive imager. The Raspberry Pi foundation keeps an up-to-date list of imagers for Windows, however, we'd recommend Rufus
- If needed, decrypt your boot volume (Bitlocker) before the InstallFest starts
- Backup your data! Yes, really!
- Warning! Please make sure you have a backup of any data you do not want to lose. We are providing the instructions as they are, and we are not responsible for any data loss that might occur. By using them you agree you are assuming your own risk.
- This is less important but still a good idea for the VM approach.
Install methods
If you're here its probably because you'd like to begin working with and using Linux <3.
But there are a few different ways to install Linux depending on what you want to end up with.
Here we'll outline the different ways you can install Linux, and which might suit you best.
Pure Linux
This is where you fully replace your current OS with Linux. This means bye-bye to Windows and only Linux.
Dual boot
Probably the most popular option, this is where you get to have multiple operating systems on your device at once. You'll do this by partitioning your hard drive into a Windows section and a Linux section, then each time you turn on your device you get to choose which to use. This means you can have the best of both worlds.
Virtual Machine (VM)
A Virtual Machine is a simulation of a computer, on a computer. It's a great way of playing around with an OS you want to try out but you're not sure about, or for performing experiments on.
Operating systems definitely run slower and on virtual machines than on the bare metal, but if you don't want to switch your main operating system, but still be able to have a Linux machine to do experiments / projects on, this might be a good option.
Windows Subsystem for Linux (WSL)
This option is quite similar to using a VM but with basically none of the performance and clunkiness drawbacks... as long as you're willing to using the shell for everything.
WSL gives you a Linux virtual machine that you can access via the Windows command prompt and has your Windows file system mounted for easy integration between the two.
Now you can use your favourite Linux tools on your Windows files without having to restart or boot up a big slow virtual machine!
Distributions
Linux comes in different flavours or "Distributions" (aka distros). While it's the same kernel (core of an operating system) they can each work differently on top e.g. how software gets installed, how networking works, how it looks. There are endless distros out there if you want, but to make things simpler we've chosen to write this guide for just one: Ubuntu.
Maybe the most popular distribution out there, Ubuntu is a really great distro. It looks great and is easy to use, it's kept up to date and has great support for packages and software. Just because it's "good for beginners" doesn't mean it's any less advanced / capable than any other distro, remember they're all built on the same underlying kernel, it's just how things get done on top of that that changes.
Before proceeding with installation
Please don't forget to make a backup of any important data!
Windows disk encryption/Bitlocker
Windows 10/11 Pro/Education/Enterprise Edition
If you have Windows 10 or 11 Pro, Education, or Enterprise Edition, then you should have Bitlocker on your device. This is Windows' built-in drive encryption tool and is usually enabled by default. However, it is impossible to resize partitions when they are encrypted, so Bitlocker must be disabled before installing Linux.
To disable, go to the "Manage Bitlocker" page in Windows, and then choose "Turn off Bitlocker". You will have to wait for the drive to decrypt. This may take a long time if the drive has a lot of data on it.
Windows 10/11 Home Edition
If you have Windows 10 or 11 Home Edition, then you should have Windows Device Encryption. For the average user, this is pretty similar to Bitlocker in that it encrypts your Windows drive. This, of course, means we need to disable this if it is enabled as it is impossible to resize partitions when they are encrypted, a step necessary for installing Linux in dualboot configuration.
To disable, search "Device Encryption" in the Windows start menu, then choose to disable encryption for your device. (If you search this term and nothing shows up, please Google how to access device encryption settings on your Windows version or ask for support in the Discord as there are a myriad of ways of accessing this setting that all seem to work with varying success).
What is the BIOS and why do we care?
The BIOS is the part of your computer responsible for managing hardware and booting other operating systems.
The BIOS is where we configure some of the lowest level hardware to make sure it's compatible before we mess around with our operating systems, so we're going to need to interact with it when preparing to dual boot.
Since the vast majority of laptops come with Windows preinstalled, their BIOSs are often preconfigured with settings developed explicitly for Windows. Therefore when dual booting some if these settings can be incompatible with installing Linux and we need to tweak them.
How to access the BIOS
The BIOS is only really accessible when you boot your PC so you can't adjust its settings while running an OS. You're going to have to restart your device. There are 2 ways to access the BIOS: you can trigger it from Windows OR restart your computer and enter manually.
The way its entered manually is a bit manufacturer specific in terms of which key to press whereas the Windows method is longer but more standardised.
From Windows:
1: Open Settings
2: Go to Update & Security
3: Open the Recovery tab
4: Under "Advanced Settings" restart your device using the Restart Now button
5: When your device restarts and you're presented with a menu select Troubleshoot
6: Select Advanced Options
7: Select UEFI Firmware settings
8: Click Restart
Your device will now restart and take you straight to the BIOS.
Manually:
Restart your device. Before you enter Windows you will see an icon of your laptop manufacturer e.g Lenovo, Dell etc.
At this screen press the F1 key and you should be brought to the BIOS.
If not don't worry it's just that the manufacturer has changed the button to press.
There might also be a message, for example Lenovo shows: "To interrupt normal startup press Enter". Press the key it says and you should be brought to a menu with several options, one of which will either say "adjust BIOS settings" or something similar, use the arrow keys to select this and press Enter.
How to do stuff in the BIOS
The BIOS is very low level, hence why it looks simple and works simply. You can move around the menu with the arrow keys, maybe the Tab key and selecting submenus using the Enter key, and perhaps readjusting the ordering using the +/- keys.
Hopefully it will have a handy guide of which keys do what, but if in doubt Google how to navigate your manufacturer's BIOS.
It's a bit difficult to give a general guide since the BIOS is specific to every manufacturer's motherboard but it will have all the settings you need somewhere and hopefully organised fairly logically.
In general they have several tabs, each with a different category of settings; you use the arrow keys to move selection and the Enter key to change things. There will probably be a BOOT/Startup tab that's important to us.
It's important that you make sure to SAVE the settings before leaving the BIOS, make sure when you exit you select whichever option is "Save and Exit" not just "Exit". Otherwise, guess what, all the changes you made won't stick.
Here are a few common things you should configure in the BIOS before going ahead:
Boot order
Boot order is very important to actually be able to boot to the installation media, like a USB!
By default, the system will try and boot off the first hard drive/solid state drive available, however, modern computers can boot off of many different media types, including network, cd drives, usb drives, etc.
In your BIOS, locate a section for "Boot Order", and rearrange them to place USB at the very top, before any other method. It's possible that your BIOS doesn't have this setting - which is very sad. If it doesn't, then when you try to boot your installation media, you need to interrupt the boot process and manually select the USB drive.
Fast Boot
Fast Boot is a Windows-only technology that enables faster booting where instead of "properly" shutting down, the computer enters a state similar to hibernation which allows faster loading of the Windows kernel and drivers. Disabling Fast Boot will make your Windows boot times slightly slower, but probably only by a few seconds at worst. In some cases having it on may cause problems accessing your Windows partition from Linux, or problems booting Linux altogether. If so you can disable it.
To disable it, first disable fast startup in Windows, and perform a full shutdown before rebooting into the BIOS. Then disable it in the BIOS.
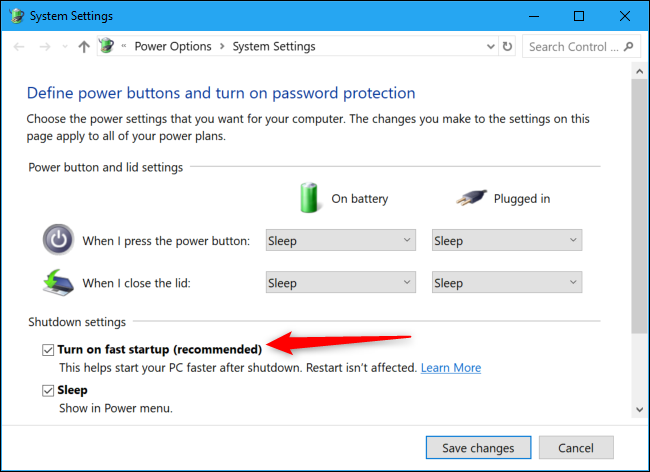
Then, you can set Fast Boot to Disabled, usually found under the BOOT tab.
Intel RST
You may or may not need to do this step. Please read the following paragraphs to understand what RST is and to learn how to identify whether you will need it.
Intel Rapid Storage Technology can generally speed up your system and make it feel more responsive, however, because of a lack of drivers on Linux, it's quite common that your installer will not detect your hard drive if you have it enabled.
You can disable it, usually, by modifying your hard drive to use plain AHCI instead of Intel Optane in the "Devices" section of the BIOS. However, before you do this, be aware that you may take a small performance impact and notice your hard drive speeds a bit slower than before. Also, note that if you're planning on keeping Windows around, you'll need to do some prep before making the change.
The Ubuntu installer will prompt you if changes to Intel RST are required. It's easy to determine as you won't see your disk in the installer list, when you reach the partitioning step in the guide. If this happens, come back here and follow the guide below.
To avoid the chance of something going wrong, follow the guide on the Ubuntu discourse here, taking special note of the required instructions on the Windows side of things.
Virtual Machine Pre-install
If you're looking to install Linux in a Virtual Machine, you need to make sure of two things:
- Virtualisation is enabled in BIOS
- Installing VirtualBox
You will need:
This guide will tell you how!
Enabling virtualisation in BIOS
Intel CPU users:
Reboot your computer and go into your BIOS/UEFI. You usually need to press F1, but check for your specific key. Google is your friend :-) Your BIOS/UEFI might look different than the images below, but they all have these functions!
Once you are in the BIOS/UEFI navigate to the Security tab. You probably don't have mouse, so just use the arrow keys.
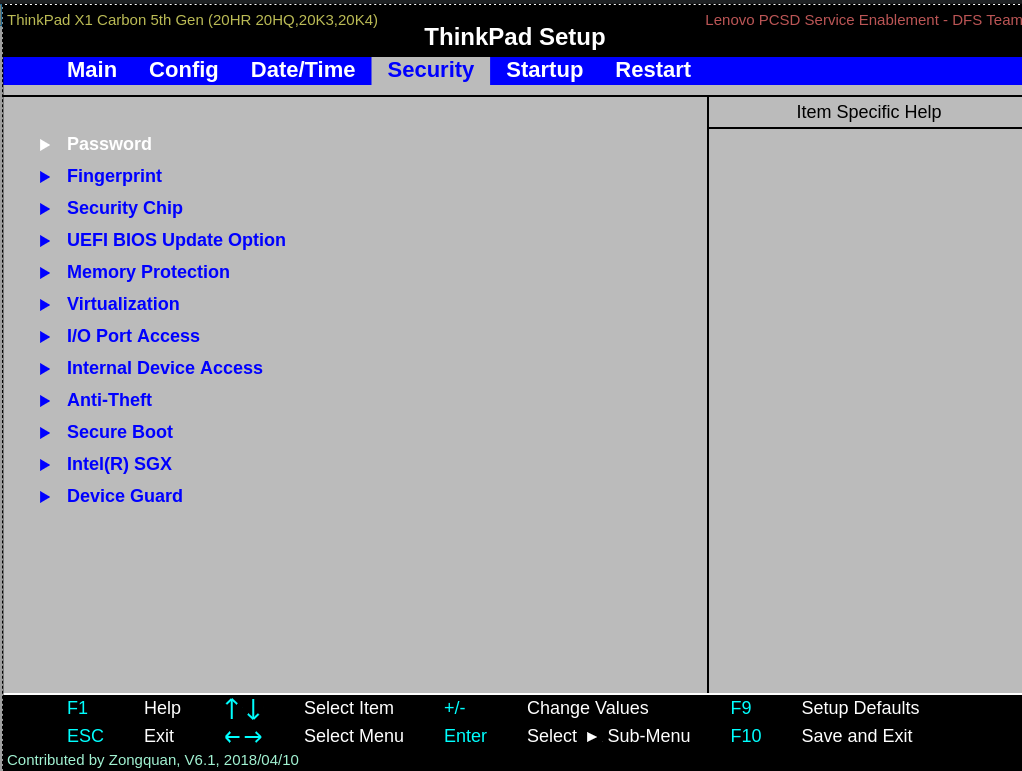
Once in the Security Settings, navigate to the Virtualisation settings and press Enter. Enable both Intel Virtualisation Technology and Intel VT-d Feature.
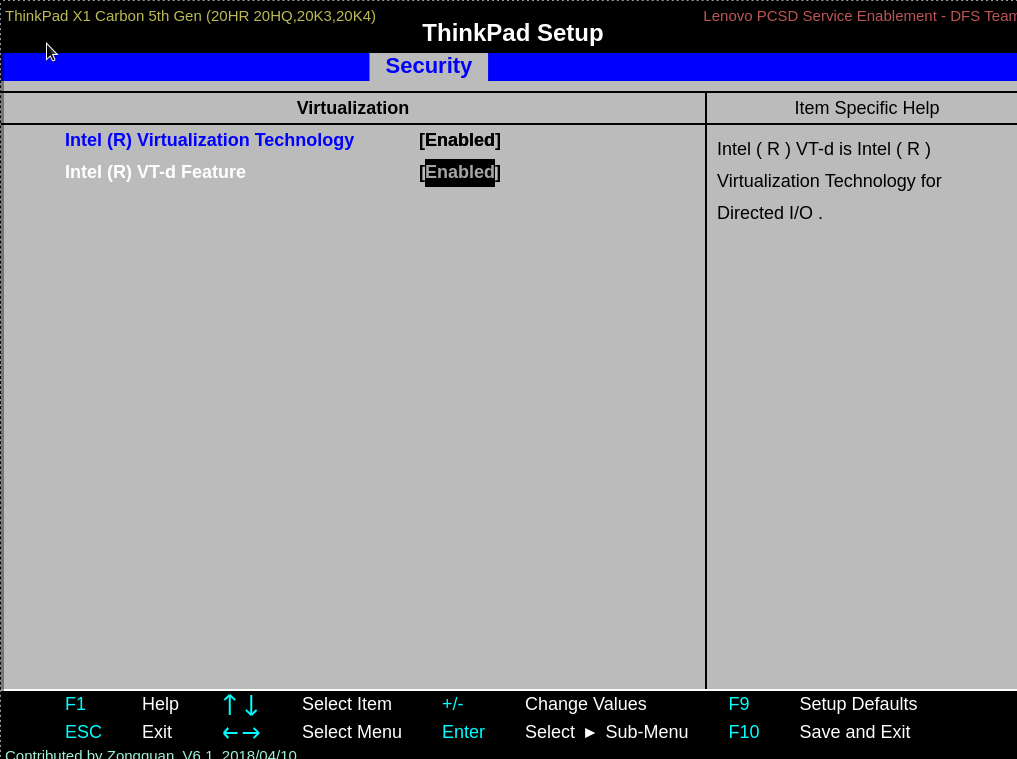
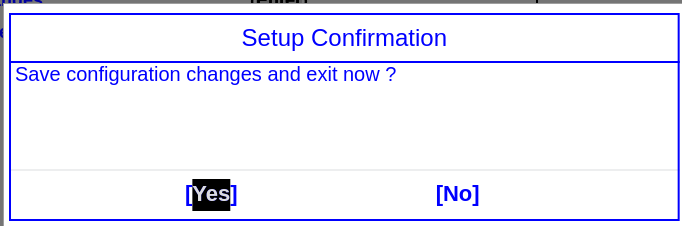
Then press F10 to save and exit. Confirm you want to save the settings.
Done! You're ready to get started on your VM journey!
AMD CPU users:
Reboot your computer and go into your BIOS/UEFI. The key you will need to press varies, but it should be F1, F2 or DEL. Check for your specific key (you can google it if you know your motherboard manufacturer, or look for a prompt on screen when booting).
Your BIOS/UEFI might look different than the images below, depending on your motherboard, but you will need to find the configuration items related to the CPU/processor. They might be under Processor, Chipset, Advanced CPU configuration or Northbridge.
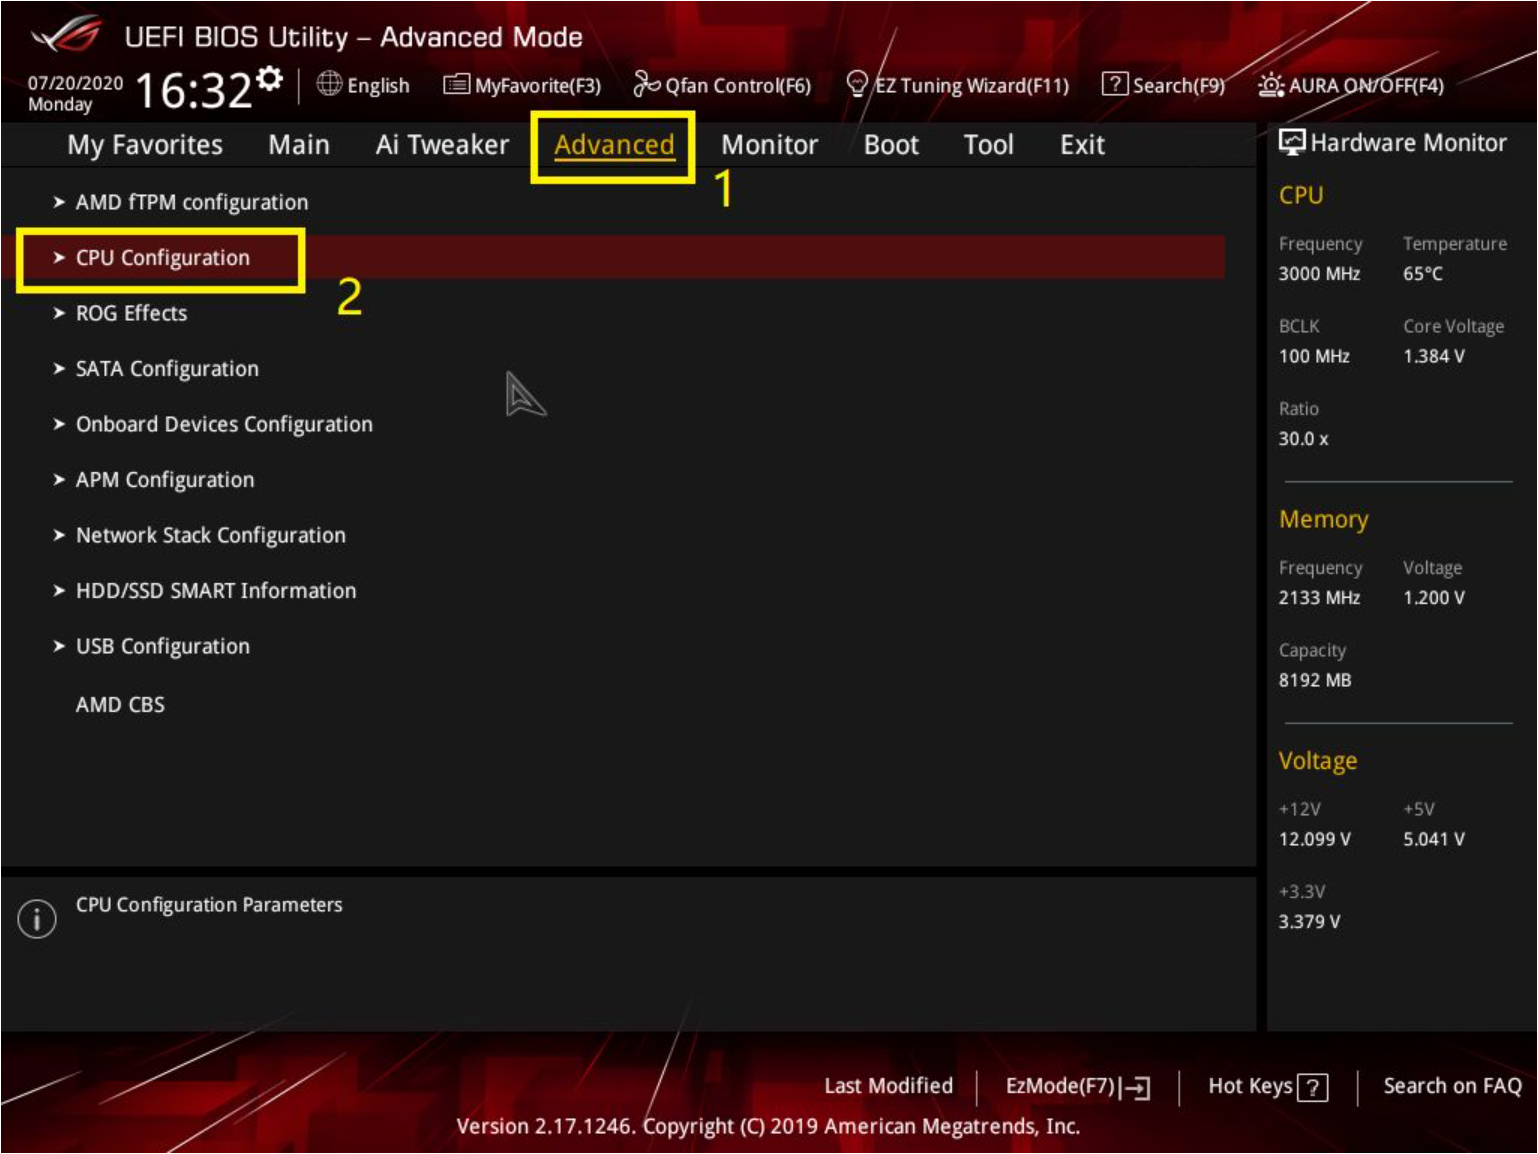
Here, you will need to locate the virtualisation option. It might be labelled SVM mode, AMD-V, AMD IOMMU, VT-x or Vanderpool. Make sure that it is set to enabled.
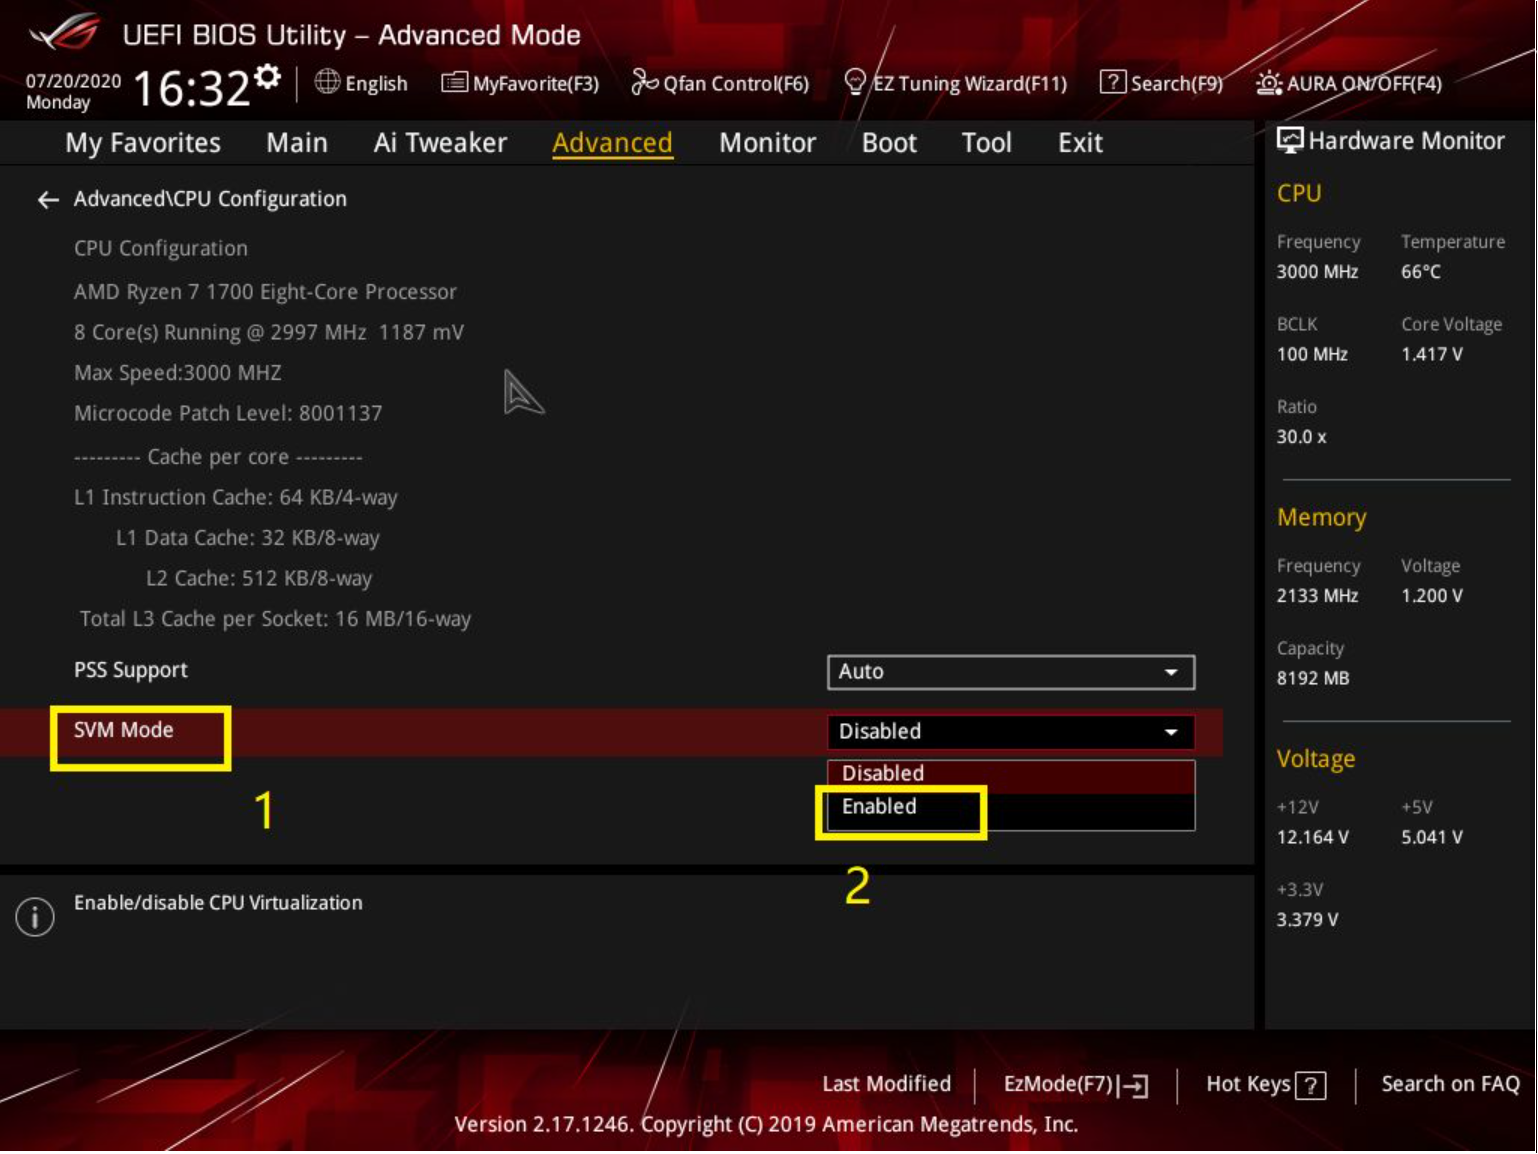
Save changes and exit (press F10).
Installing VirtualBox
Download VirtualBox from the above link and run it. Make sure all the features are enabled.
Proceed by clicking Next and confirm installation when notified network
might disconnect while VirtualBox is installing.
You will be prompted to install drivers for it, proceed their installation.
Congrats! You can now start VirtualBox!
Installing VirtualBox Extension Pack
VirtualBox Extension Pack will add some extra functionality to the VM, which you might find convenient, most important being support for virtual USB 2.0/3.0 controllers.
Open VirtualBox, then go to File -> Tools -> Extension Pack Manager. Click the +
button (on the right hand side of the window) to add the extension. Navigate
to where the Extension Pack was saved and select it.
You will be prompted that you are about to install an extension pack. Confirm by pressing Install, then Agree with the T&C.
Upon successful addition you should see the pack in the list:
That's it! Now head over to here.
Install instructions
In the following sections you will find info on how to install Linux. You've chosen your install method, now let's talk a bit about Linux distributions. You should choose one, but if this is your first encounter with Linux, we recommend you go for Ubuntu.
Linux comes in different flavours or "Distributions" (aka distros). While it's the same kernel (core of an operating system) they can each work differently on top e.g. how software gets installed, how networking works, how it looks. There are endless distros out there if you want, but to make things simpler we've chosen to write this guide for Ubuntu.

Maybe the most popular distribution out there, Ubuntu is a really great distro. It looks great and is easy to use, it's kept up to date and has great support for packages and software. Just because it's "good for beginners" doesn't mean it's any less advanced / capable than any other distro, remember they're all built on the same underlying kernel, it's just how things get done on top of that that changes.
The following section will give you the instructions on how to install Ubuntu on your computer.
Please choose the appropriate method of installation.
Warning! If you are installing it as a replacement OS or dualboot, please make sure you have a backup of any data you do not want to lose. We are providing the instructions as they are, and we are not responsible for any data loss that might occur. Use at your own risk.
Choose from:
- Just Ubuntu -- replace your current OS with Ubuntu; this will completely erase data on your computer; backup anything you need.
- Dualboot -- install Ubuntu alongside an existing Windows install; backup any important data, in case something goes wrong
- VM -- install Ubuntu in a Virtual Machine; there will be no data loss; instructions are for Windows
- WSL -- instructions on how to install Windows Subsystem for Linux and get Ubuntu running; no data loss expected
Replacing current OS with Ubuntu
Warning: This method will delete your Windows partition. Please make sure you have made a backup of all the data you do not want to lose.
Step 1 (Preparation)
We will have some pre-flashed USBs at the InstallFest if you don't have one. If you are using one of these you can probably skip step 1, please ask!
Before starting, download Ubuntu Desktop LTS 24.04.3 from https://ubuntu.com/download/desktop. LTS stands for Long Term Support, so this system will be supported for at least the next 5 years without an upgrade to the next version.
You'll get an ISO file, which is a disk image. You need to flash this to a USB drive using an imager tool, we recommend Rufus. Warning: Flashing a USB drive will overwrite any data currently on the USB. Please make sure to backup any data you do not wish to lose.
In Rufus:
- Select the USB device you want to flash (plug it in first!)
- Select your ISO file
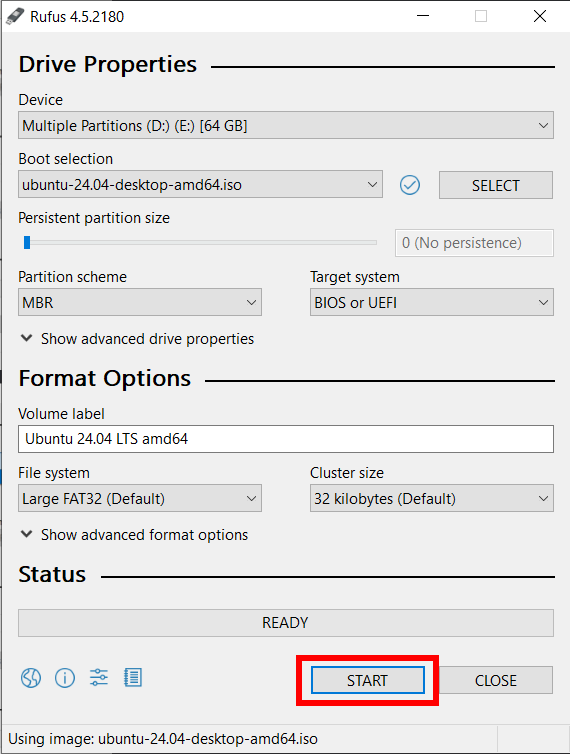
- Press start (we advise leaving all other options default)
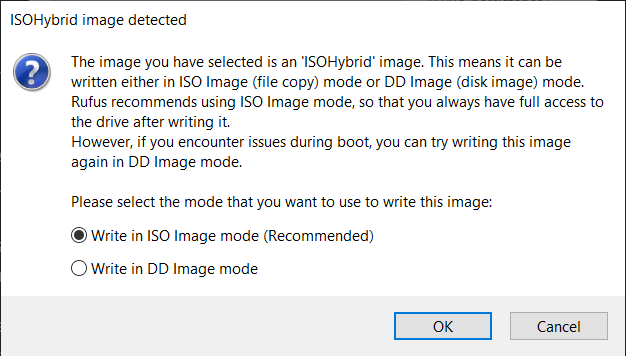
- If you receive the following pop-up, select 'ISO Image mode' and press OK
- Wait! It may take a while, but when the bar is fully green, the drive is flashed

Step 2 (Boot)
To boot into the live installation media, plug your USB into your computer/laptop, and reboot - you should be able to boot off it with no problems.
Once boot has finished, you should be presented with the installer!
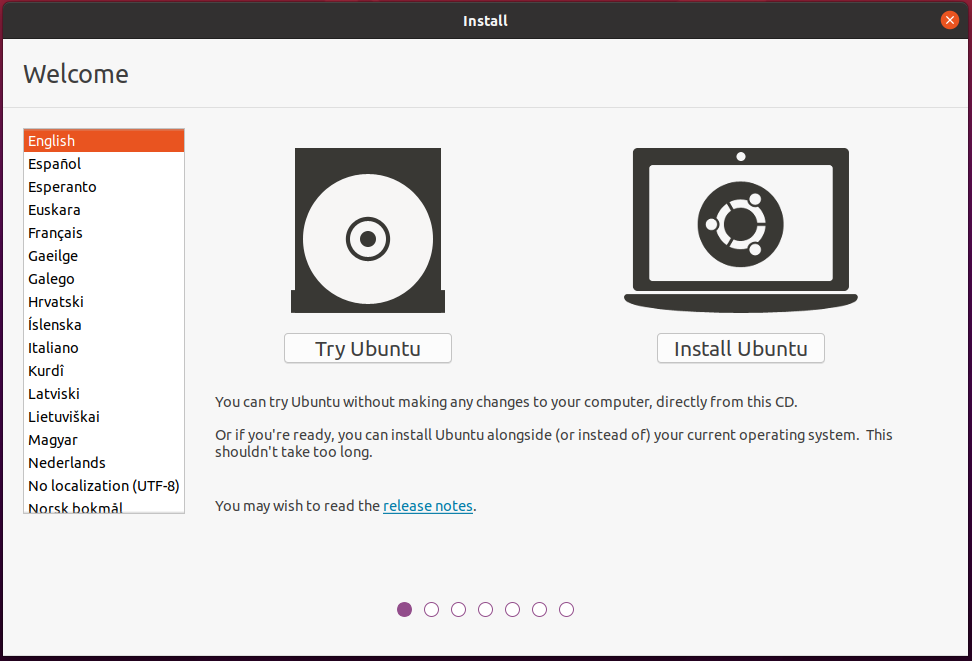
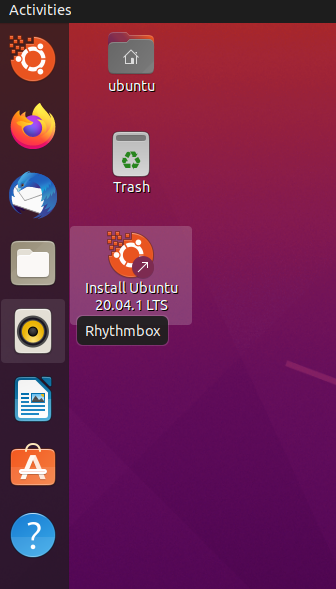
Click "Try Ubuntu" to be able to play around with a live preview (or need to use one of the bundled tools to help with installation), otherwise, go direct to "Install Ubuntu".
If you click "Try Ubuntu", you can find the installer later by clicking the icon on the desktop:
Step 3 (Installation)
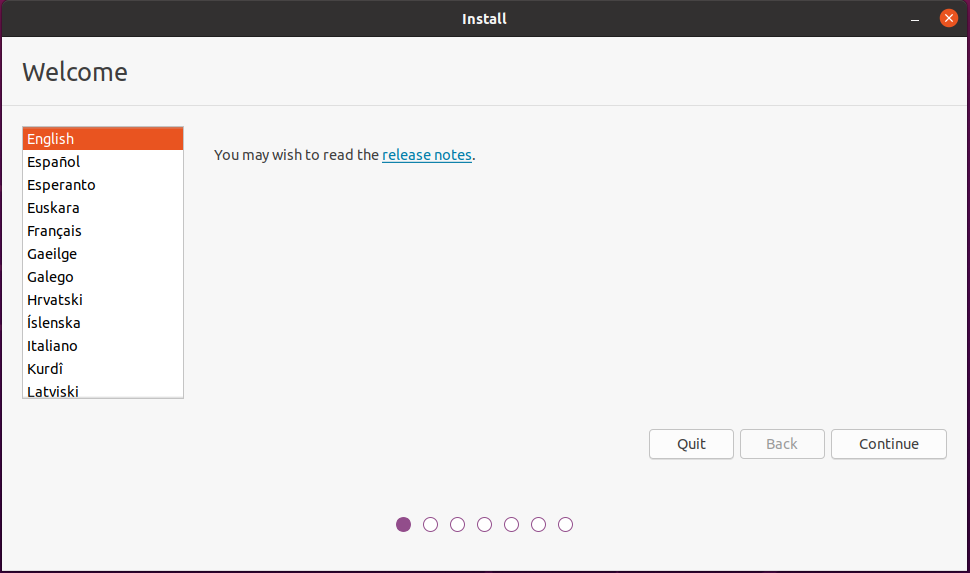
Select your language
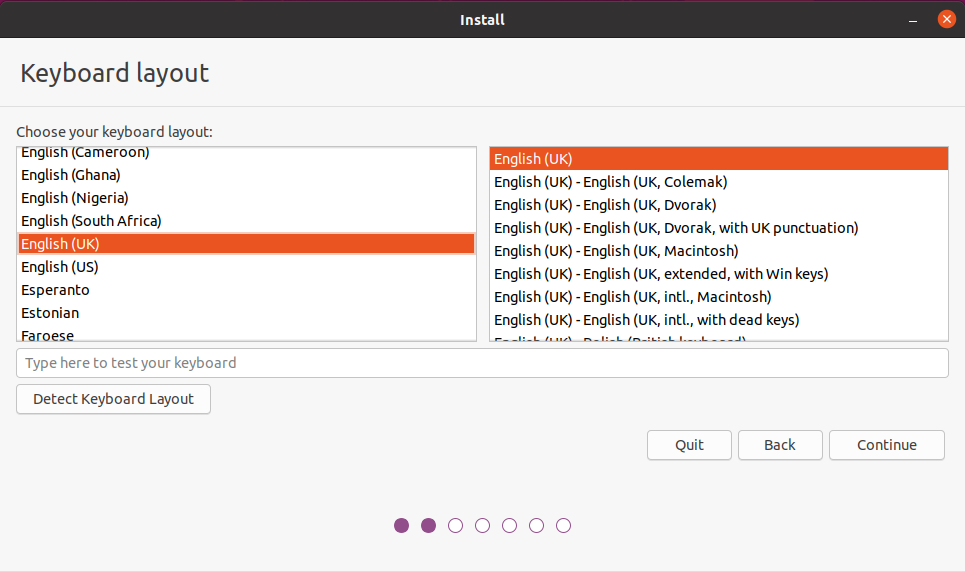
Select your keyboard layout
The auto-detect keyboard should walk you through finding out exactly what layout you have if you're not sure.
Connect to the internet
Choose the wifi you want to connect to:
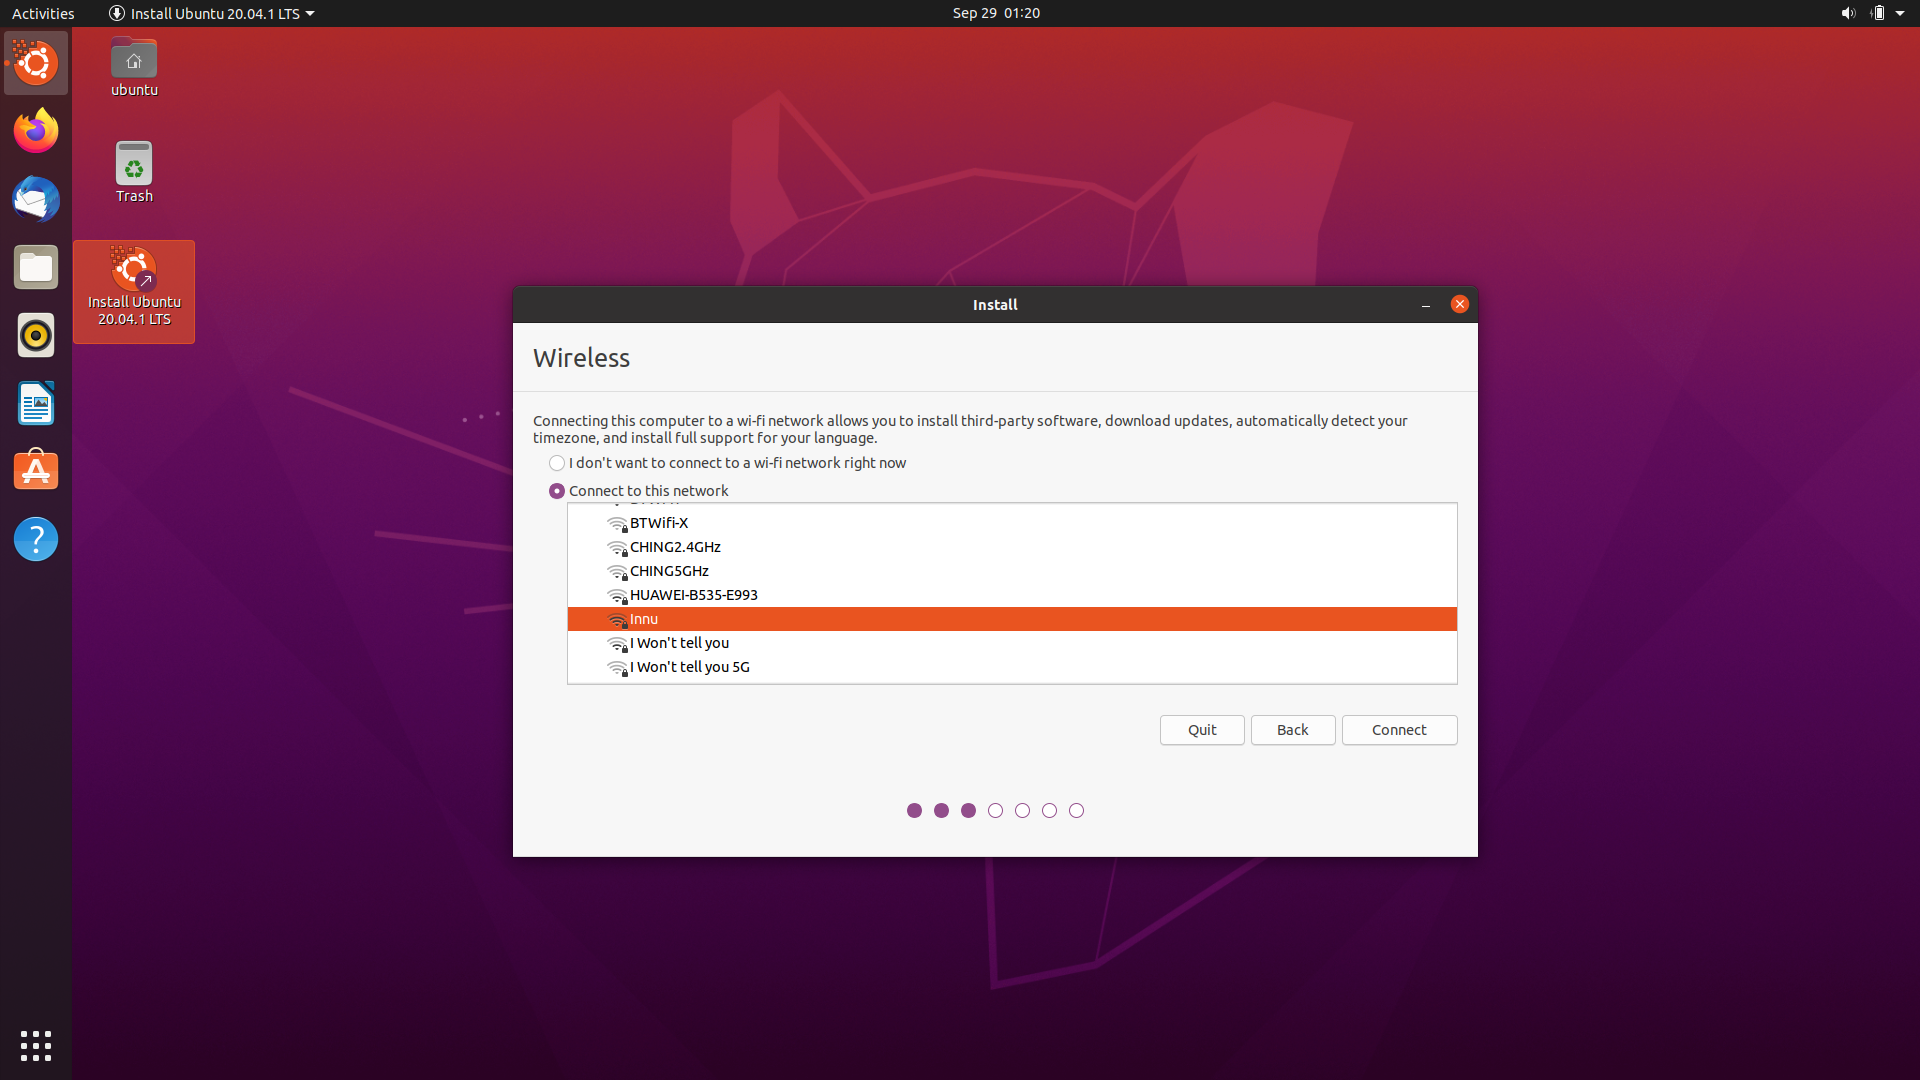
If you're on campus it's recommended to setup Eduroam now.
Select software
In most cases you want a "Normal installation" with all the utilities - however, if you're working with less disk space, or want to manually install only the tools you want later, then go with a "Minimal installation".
If you have an internet connection, then select "Download updates" - it makes the install process a little longer, but ensures that everything will be properly up to date.
The "Install third-party software" is slightly more complex. In most cases, you should tick it, and attempt an install - if something breaks and doesn't work, for issues related to drivers, then you can try again, disabling this step, and instead trying to install the drivers and codecs after the install is fully complete.
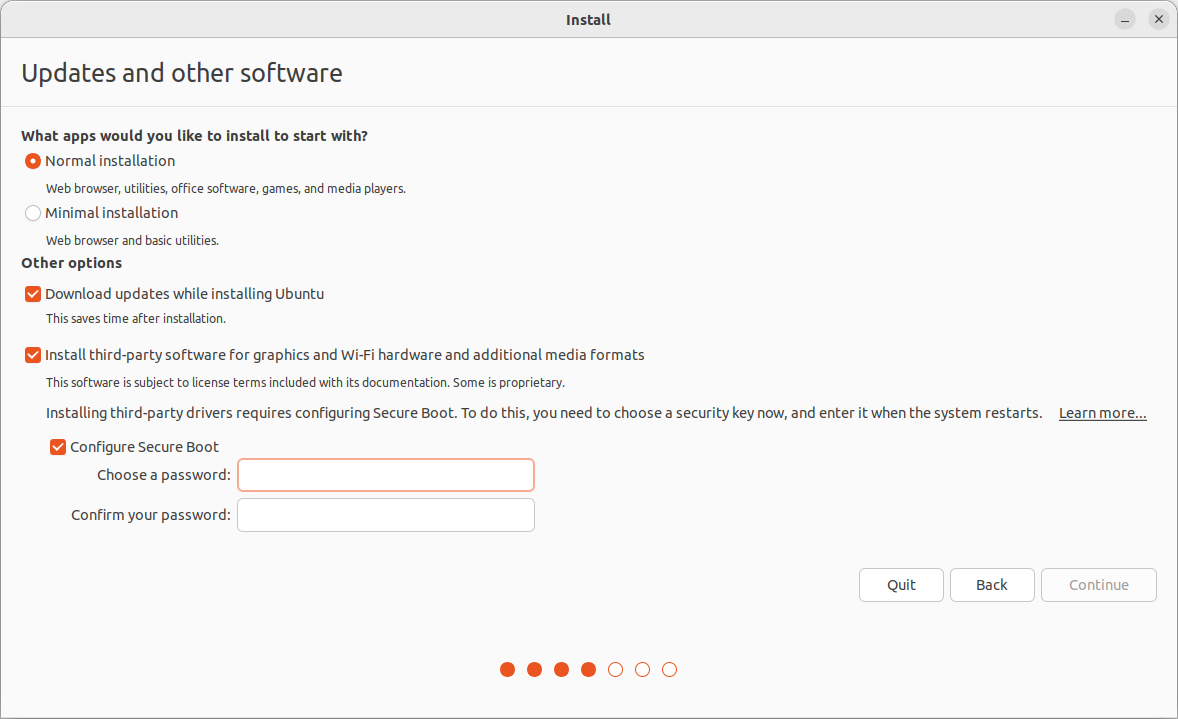
Remember to configure secure boot. When you reboot after installing, you will need this password to enrol your key.
Choose installation type
Be careful at this step! After you click "Install Now" the install process will begin!
For a pure install, click "Erase disk and install Ubuntu".
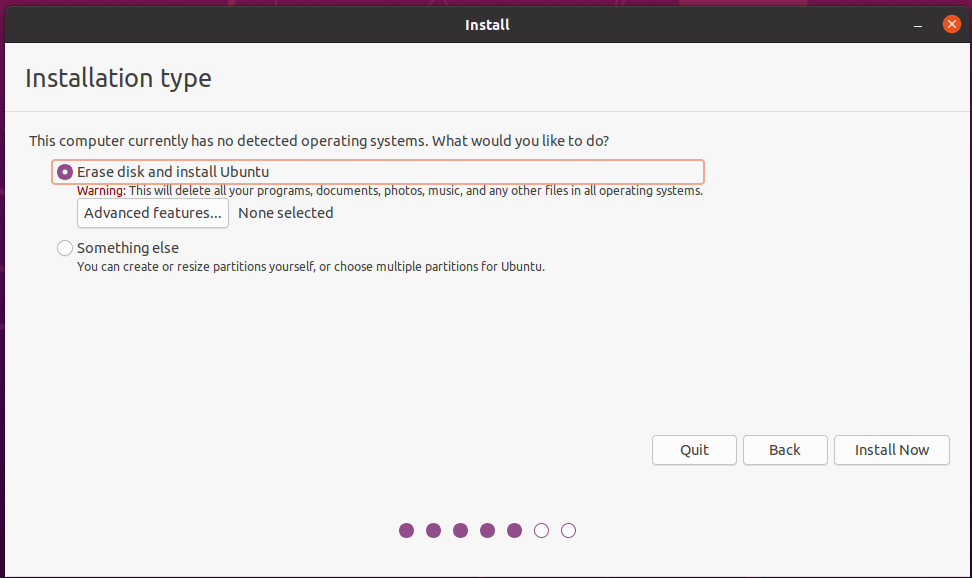
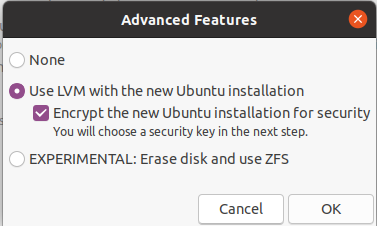
At this step, you can also choose to encrypt your disk, by selecting "Advanced features" and selecting both "Use LVM" and "Encrypt the new Ubuntu installation". However, this is optional, and requires you to input your password at each boot.
After you click "Install Now", you'll be asked if you want to proceed with the partitioning layout you've selected:
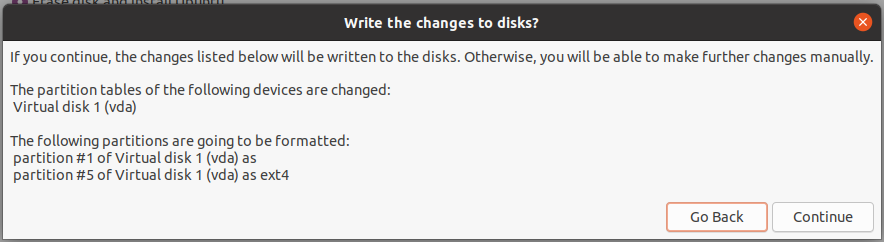
Verify the changes, and then click "Continue". Note that your partitions will look different depending on your setup.
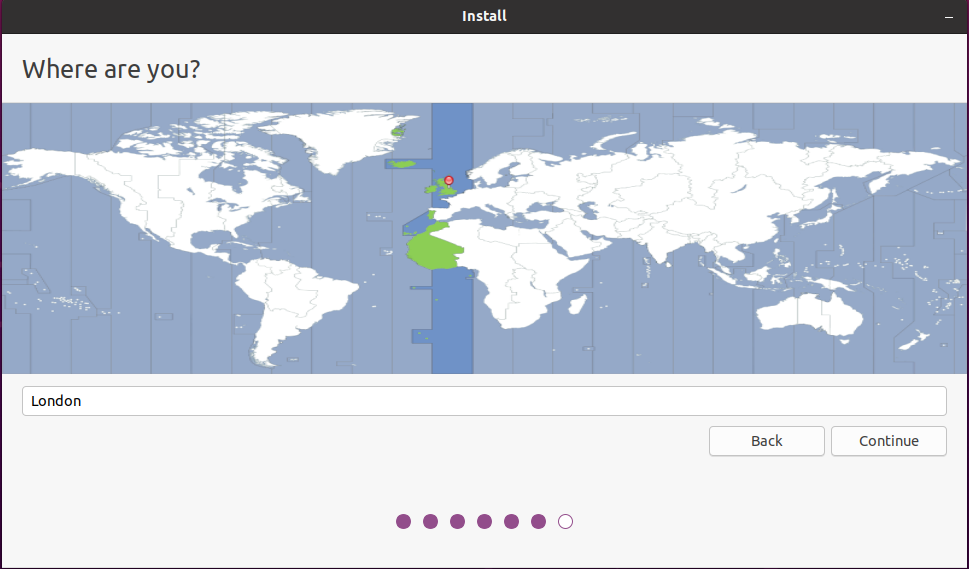
Select your timezone
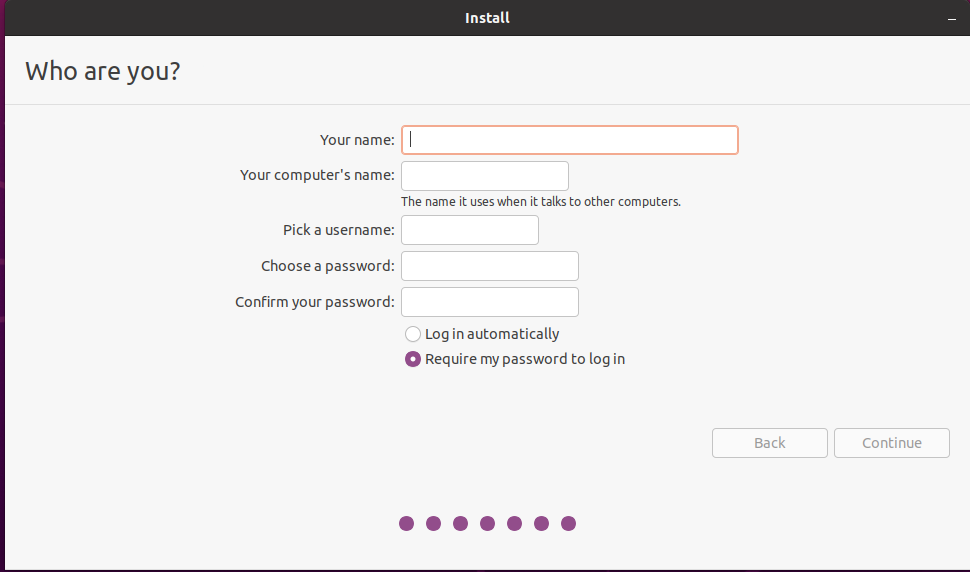
Setup your account
You need to pick:
- Your name (used in the display manager to greet you, etc)
- Your computer's name (the hostname used on networks, pick something unique and recognizable)
- Your username (used to login, appears in shell prompts, etc)
- Your password (standard password guidelines apply, if you want something easy to remember and secure, try diceware)
Wait!
Now just wait for the installer to complete!

Once it's completed, follow the prompts to shutdown, remove the installation media, and restart your computer. When you startup, you should be booted into Ubuntu!
Now head over to the Post Installation guide to update your system and install some useful software.
Ubuntu Dualboot
Warning: Please make sure you have made a backup of all the data you do not want to lose.
If you haven't checked out the Dualboot preinstall checks, go back and go through them.
Please make sure you have a backup of any data you do not want to lose. We are providing the instructions as they are, and we are not responsible for any data loss that might occur. Use at your own risk.
This guide will walk you through how to install Ubuntu as dual boot, alongside your existing Windows OS.
Step 1 (Preparation)
We will have some pre-flashed USBs at the InstallFest if you don't have one. If you are using one of these you can probably skip step 1, please ask!
Before starting, download Ubuntu Desktop LTS 24.04.3 from https://ubuntu.com/download/desktop. LTS stands for Long Term Support, so this system will be supported for at least the next 5 years without an upgrade to the next version.
You'll get an ISO file, which is a disk image. You need to flash this to a USB drive using an imager tool, we recommend Rufus. Warning: Flashing a USB drive will overwrite any data currently on the USB. Please make sure to backup any data you do not wish to lose.
In Rufus:
- Select the USB device you want to flash (plug it in first!)
- Select your ISO file
- Press start (we advise leaving all other options default)
- If you receive the following pop-up, select 'ISO Image mode' and press OK
- Wait! It may take a while, but when the bar is fully green, the drive is flashed
Step 2 (Boot)
To boot into the live installation media, plug your USB into your computer/laptop, and reboot - you should be able to boot off it with no problems.
Once boot has finished, you should be presented with the installer!
Click "Try Ubuntu" and play around with the system. Make sure everything works (keyboard, trackpad). Otherwise, go direct to "Install Ubuntu".
If you click "Try Ubuntu", you can find the installer later by clicking the icon on the desktop:
Step 3 (Installation)
Select your language
Select your keyboard layout
The auto-detect keyboard should walk you through finding out exactly what layout you have if you're not sure.
Connect to the internet
Choose the wifi you want to connect to:
If you're on campus it's recommended to setup Eduroam now.
Select software
In most cases you want a "Normal installation" with all the utilities - however, if you're working with less disk space, or want to manually install only the tools you want later, then go with a "Minimal installation".
If you have an internet connection, then select "Download updates" - it makes the install process a little longer, but ensures that everything will be properly up to date.
The "Install third-party software" is slightly more complex. In most cases, you should tick it, and attempt an install - if something breaks and doesn't work, for issues related to drivers, then you can try again, disabling this step, and instead trying to install the drivers and codecs after the install is fully complete.
Remember to configure secure boot. When you reboot after installing, you will need this password to enrol your key.
Choose installation type
Be careful at this step! After you click "Install Now" the install process will begin!
For a dual boot install, choose install alongside. Click continue.
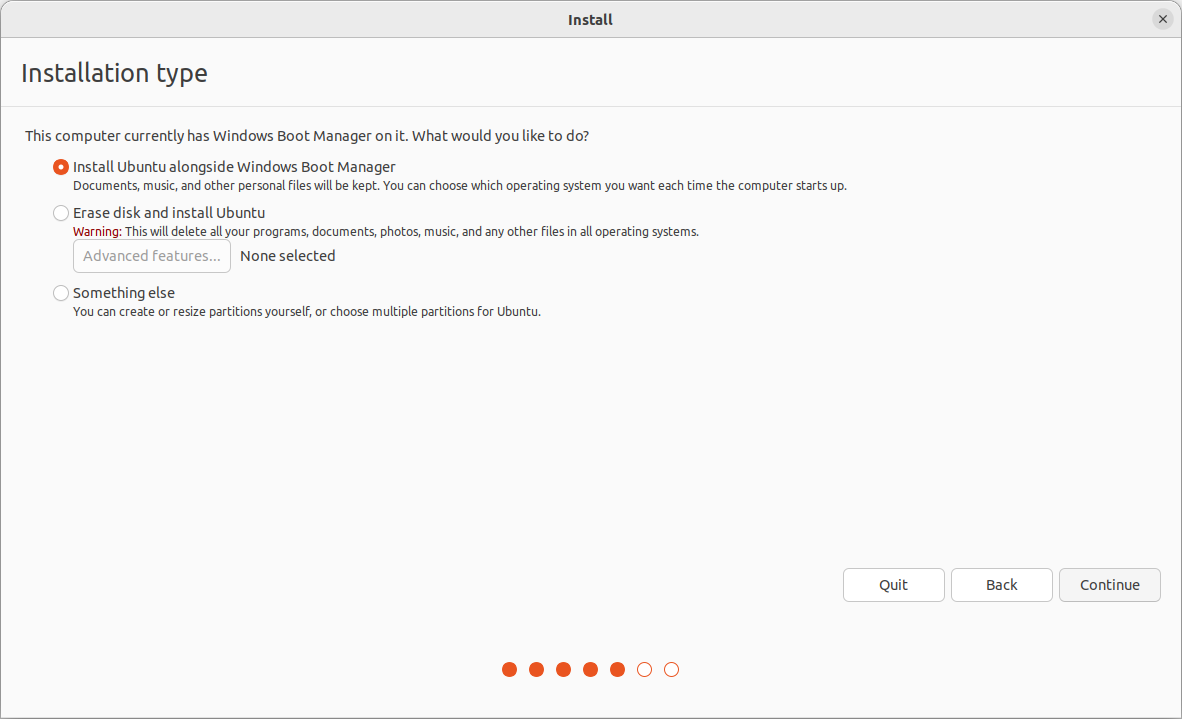
Then, choose how much space to allocate Ubuntu. As a minimum, Ubuntu should have at least 30GB.
The installation will start.
Select your timezone
Setup your account
You need to pick:
- Your name (used in the display manager to greet you, etc)
- Your computer's name (the hostname used on networks, pick something unique and recognizable)
- Your username (used to login, appears in shell prompts, etc)
- Your password (standard password guidelines apply, if you want something easy to remember and secure, try diceware)
Wait!
Now just wait for the installer to complete!
Once it's completed, follow the prompts to shutdown, remove the installation media, and restart your computer. When you startup, you should be booted into Ubuntu!
(Optional) Step 4 - Re-enable Drive Encryption in Windows
As directed by Dualboot pre-install checks, you may have had to disable Windows Bitlocker/drive encryption before starting the process of installing Ubuntu. If this is the case, you may wish to re-enable drive encryption for your Windows partition - not everybody does re-enable it, especially if you won't use the Windows boot much or if you won't carry or travel with the device much, but many people do choose to. If you do wish to re-enable drive encryption for Windows, follow the steps below.
Ease-of-Use Tradeoff
Before walking through how to re-enable Windows drive encryption, it is worth mentioning that while this method should work with no issues, it does introduce a small extra step when you wish to boot into Ubuntu. Instead of simply powering on your device and being presented with a Grub menu allowing you to boot into either Windows or Ubuntu, you will need to enter into the Boot Menu and select Ubuntu whenever you power on the device, else you will automatically boot into Windows. If this will get in your way too much, and you'd rather forgo drive encryption, then skip this section and continue to Post Installation for tips on updating your system and installing useful software. Else, keep following these steps!
Change boot order & enable secure boot
Using a method from Dualboot pre-install checks, enter the BIOS of your device. Once inside the BIOS, find the boot order selection as mentioned in the dualboot pre-install page, and ensure Windows is made to be the priority (not Ubuntu). While in the BIOS, also make sure to re-enable the option for Secure Boot. Once you have done these two steps, Save and Exit from the BIOS. Your device should now boot into Windows as it did before beginning this guide (but Ubuntu is not lost, do not fear!).
Re-enable drive encryption
Once logged into Windows, navigate to the device encryption menu as in Dualboot pre-install checks and re-enable drive encryption. This may take a while, as decryption probably did.
Booting into Ubuntu
Once your Windows drive is encrypted, you're all set. The last step is figuring out how to boot into Ubuntu when you want to. As mentioned previously, your device will now boot into Windows by default when powered on. In order to boot into Ubuntu, you will need to press a specific key, usually F10 (though it is worth searching on Google for which key to press to enter into the Boot Menu on your device). When you power your device on, rapidly pressing this key while the screen is still black (until the manufacturer's logo pops up) should usually suffice. You should arrive into a screen that looks fairly similar to the BIOS you saw earlier. In here, select the 'Ubuntu' boot option in the menu. You should then boot into Grub or Ubuntu. That's it! Repeat this method whenever you wish to boot into Ubuntu.
Now head over to the Post Installation guide to update your system and install some useful software.
Installing Ubuntu in a Virtual Machine
This guide will help you install Ubuntu in a Virtual Machine. It is written under the assumption you are using Windows. The VirtualBox installation for MacOS should be pretty much the same. For Linux distributions, install VirtualBox through your package manager.
We may have some spare USBs with copies of the Ubuntu ISO at the InstallFest. If you are using one of these you do not need to download the ISO, instead copy the ISO to your machine from the USB (and don't forget to give the USB back when the copy has finished!).
You will need:
- The Ubuntu ISO
- If you are borrowing a USB stick from us then copy the ISO to somewhere sensible on your device
- Then you can eject the USB and let someone else use it while you set up the VM with your copy
This guide assumes you have VirtualBox installed. If you don't, it means you skipped the Virtual Machine Pre-install post! Head back there and follow those steps.
Installing Ubuntu - Unattended Installation RECOMMENDED
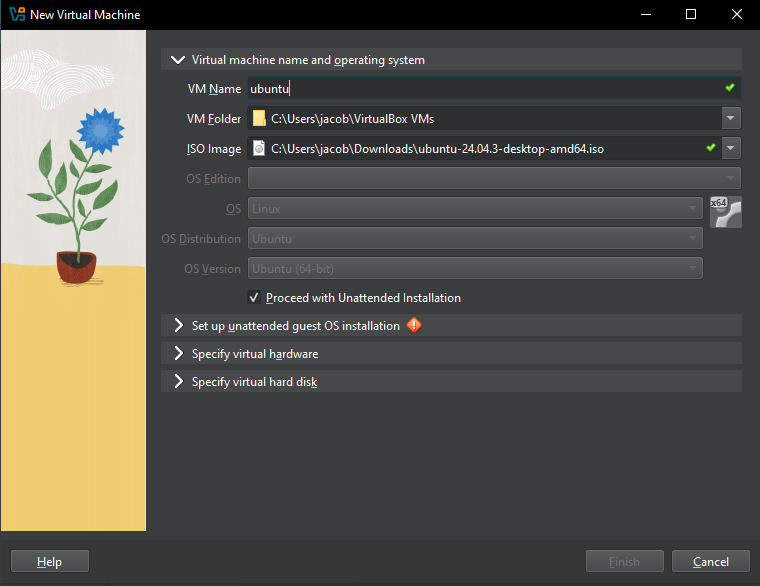
In VirtualBox, go to Machine -> New (or just press CTRL+N). Input the name
you want for your VM (good practice is to include what OS it is), select your local copy of the ISO, and tick "Proceed with Unattended Installation". This will let virtualbox automatically set up your VM without you needing to step through the installer.
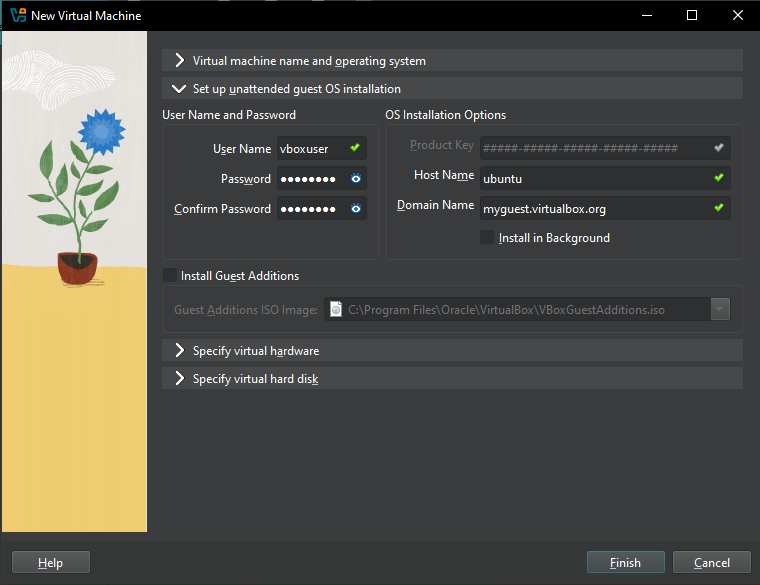
Next pick your username, password and hostname for the user account that will be set up. You can also choose to automatically install Guest Additions (for bi-directional clipboard and shared folders), but we recommend leaving this unticked for now and manually installing them after setup, as it can cause errors that prevent the installation from completing.
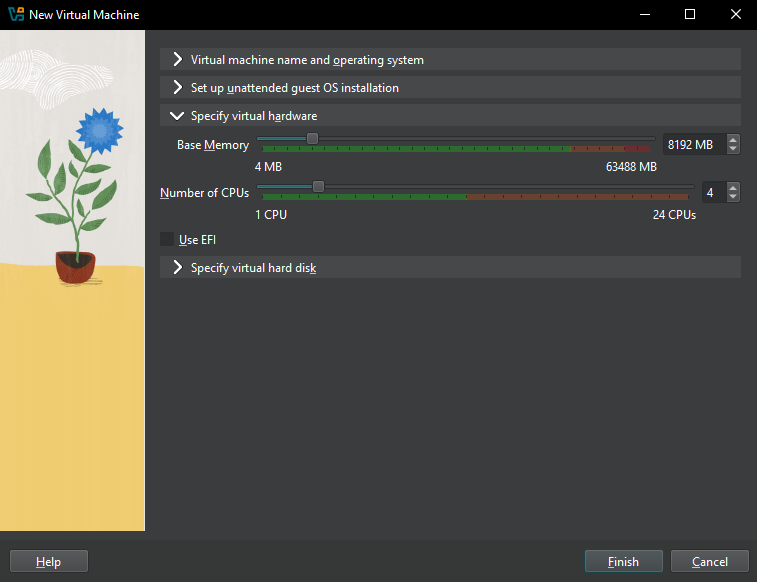
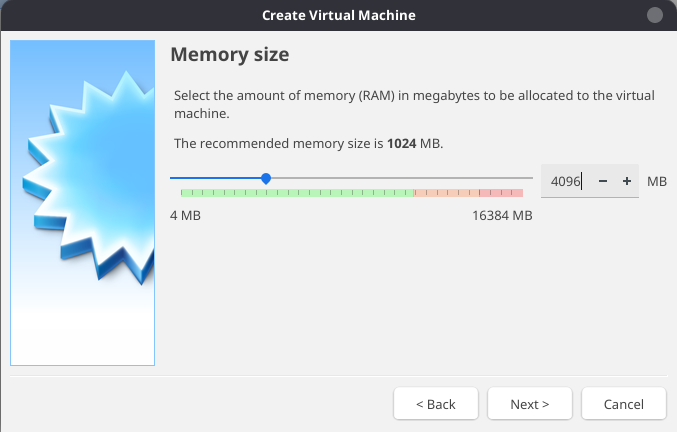
Next, you'll be asked to select the memory size. This depends on what specs your machine has. Ubuntu recommends a minimum of 4 GB RAM (4096 MB). You can allocate it more, but don't worry too much, these settings can be modified later too!
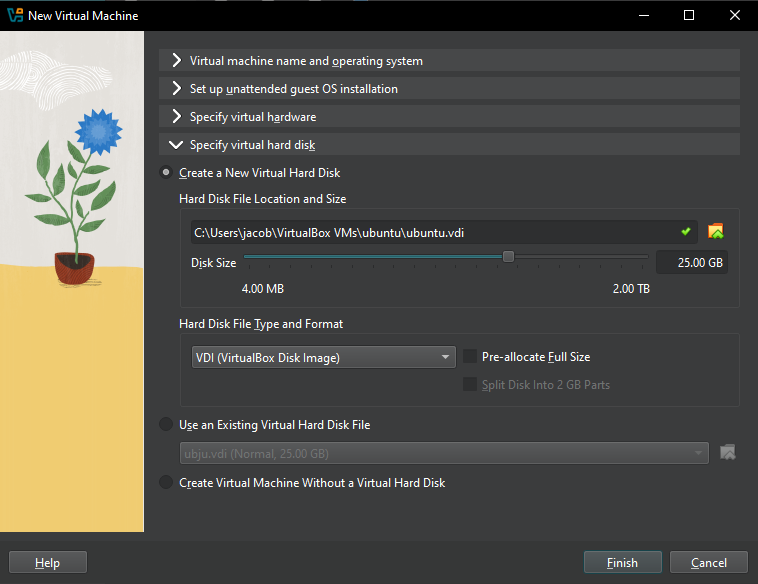
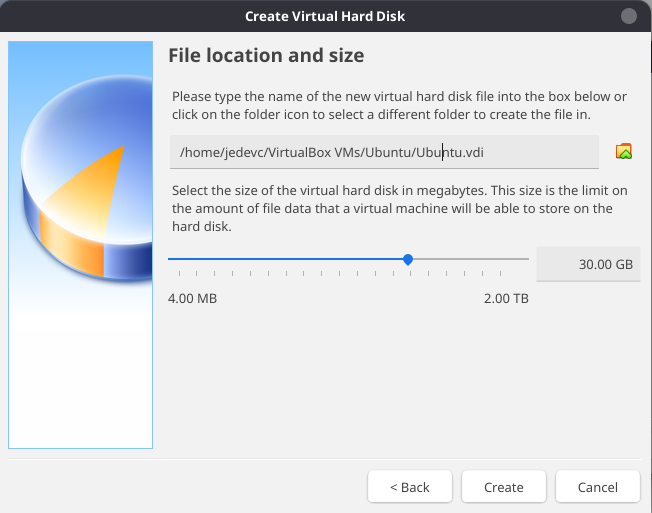
We are then going to create a virtual hard disk now (default option), and the Hard disk file type should be VDI (VirtualBox Disk Image). Choose to have the disk dynamically allocated. Next, choose the size of the hard disk. Ubuntu recommends at least 25GB.
Now you can sit back and relax while your VM is automatically installed and set up. Once it has finished installing, remove the ISO from the VM optical drive if it has not been done automatically. Then you can go here to install guest additions.
Installing Ubuntu - Manual
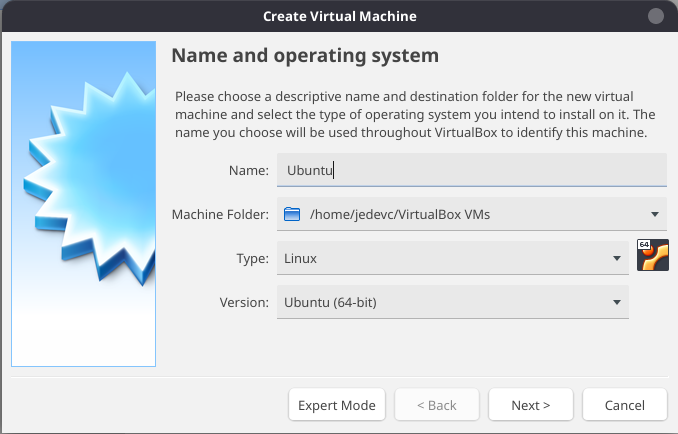
In VirtualBox, go to Machine -> New (or just press CTRL+N). Input the name
you want for your VM (good practice is to include what OS it is), select the
type as Linux and the version as Ubuntu (64-bit).
Next, you'll be asked to select the memory size. This depends on what specs your machine has. Ubuntu recommends a minimum of 4 GB RAM (4096 MB). You can allocate it more, but don't worry too much, these settings can be modified later too!
We are then going to create a virtual hard disk now (default option), and the Hard disk file type should be VDI (VirtualBox Disk Image). Choose to have the disk dynamically allocated. Next, choose the size of the hard disk. Ubuntu recommends at least 25GB.
Done! You should now see your new VM in the list:
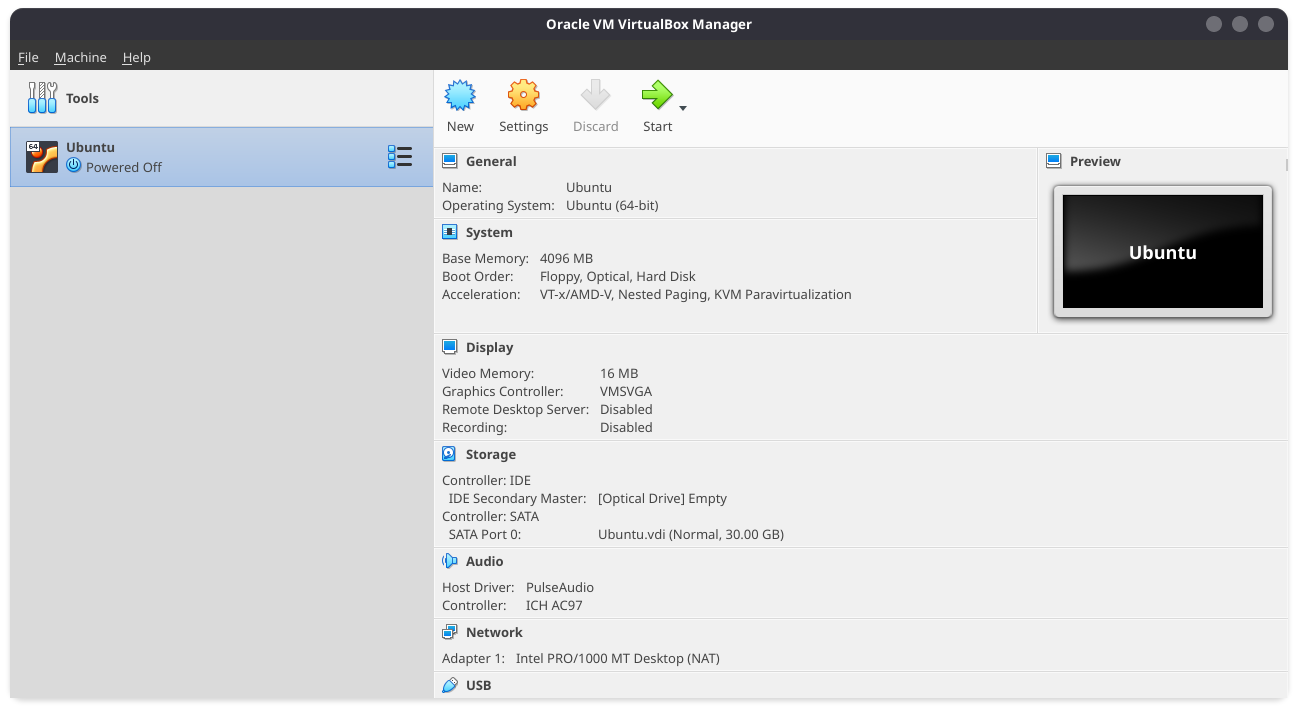
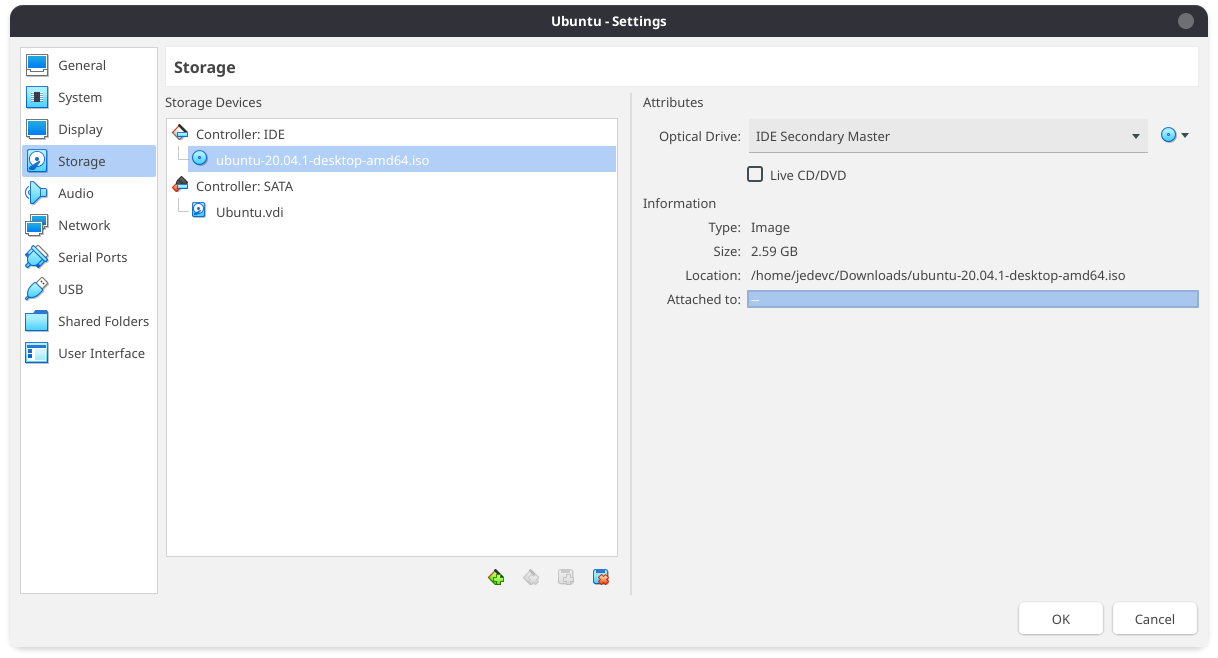
Selecting the new VM (called Ubuntu in this example), click Settings (or
press CTRL+S) and go to the Storage option. Under Controller: IDE, click
the Empty disk. Click the blue disk next to the Optical Drive dropdown, and
select Choose a disk file. Navigate to where you saved the Ubuntu ISO and
open it.
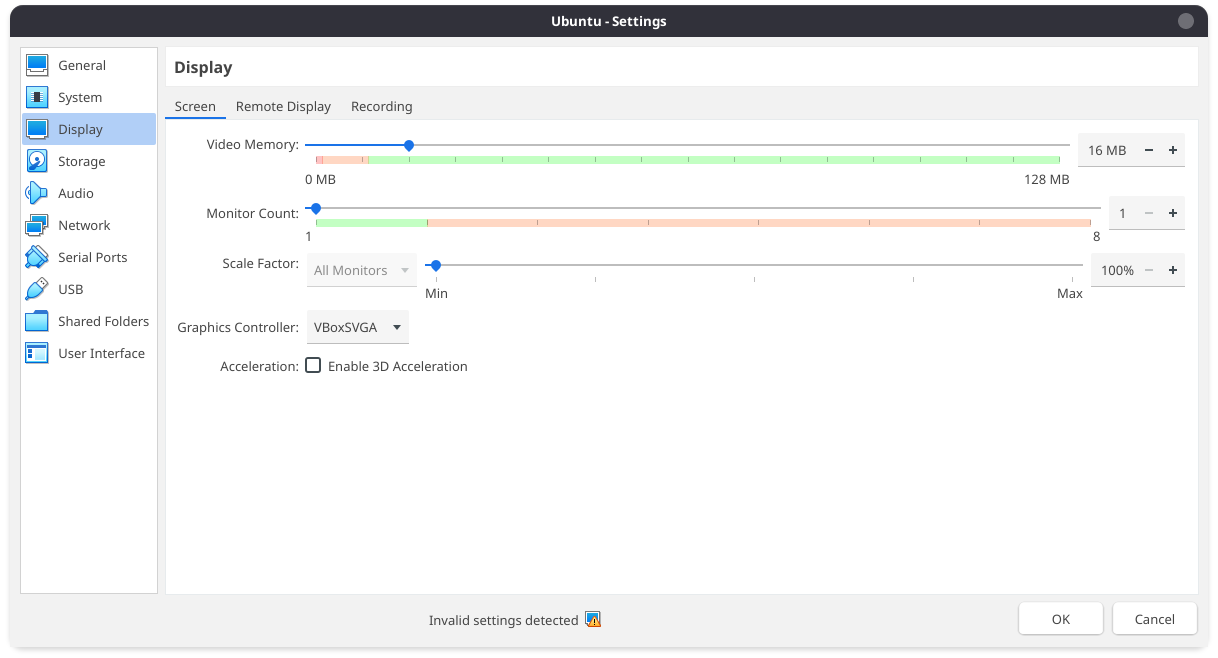
To simulate having a graphics card, VirtualBox allows you to set the amount of Video RAM given to the VM. It defaults to really low, so if you're going to use the GUI of the VM a lot it's recommended to boost it to max so the VM is nice and smooth. To do this go into the machine settings, select the display tab and drag the slider all the way to the right.
Back to the list of VMs, select the Ubuntu VM and press Start. Your VM should start. You may be asked to confirm the startup disk, select the Ubuntu ISO and press Start.
Note: If your VM gets stuck in a boot loop and the error message is related
to VMSVGA, you need to change the graphics controller. In Settings, go to the
Display option and change the graphics controller to be VBoxSVGA.
Back to the VM booting -- the Ubuntu installer should greet you:
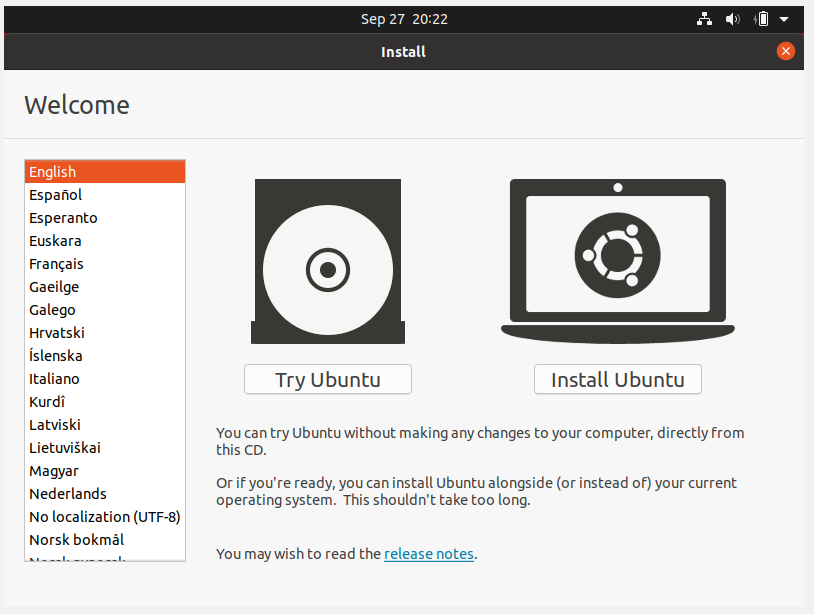
Click "Install Ubuntu" and follow the steps through.
Select your language
Select your keyboard layout
The auto-detect keyboard should walk you through finding out exactly what layout you have if you're not sure.
Select software
In most cases you want a "Normal installation" with all the utilities - however, if you're working with less disk space, or want to manually install only the tools you want later, then go with a "Minimal installation".
If you have an internet connection, then select "Download updates" - it makes the install process a little longer, but ensures that everything will be properly up to date.
The "Install third-party software" is slightly more complex. In most cases, you should tick it, and attempt an install - if something breaks and doesn't work, for issues related to drivers, then you can try again, disabling this step, and instead trying to install the drivers and codecs after the install is fully complete.
Choose installation type
Be careful at this step! After you click "Install Now" the install process will begin!
For a pure install, click "Erase disk and install Ubuntu".
At this step, you can also choose to encrypt your disk, by selecting "Advanced features" and selecting both "Use LVM" and "Encrypt the new Ubuntu installation". However, this is optional, and requires you to input your password at each boot.
After you click "Install Now", you'll be asked if you want to proceed with the partitioning layout you've selected:
Verify the changes, and then click "Continue". Note that your partitions will look different depending on your setup.
Select your timezone
Setup your account
You need to pick:
- Your name (used in the display manager to greet you, etc)
- Your computer's name (the hostname used on networks, pick something unique and recognizable)
- Your username (used to login, appears in shell prompts, etc)
- Your password (standard password guidelines apply, if you want something easy to remember and secure, try diceware)
Wait!
Now just wait for the installer to complete!
Installing Guest Additions
Guest Additions from VirtualBox will allow you to enable some very useful features, such as bi-directional shared clipboard (i.e. you'll be able to copy-paste between you host and the VM) and shared folders. Let's get started!
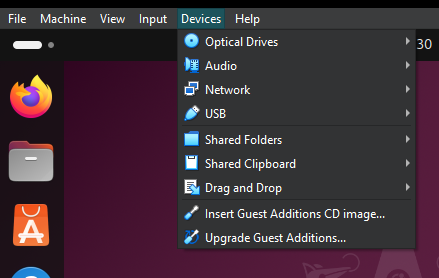
With the VM open, go to Devices->Insert Guest Additions CD image....
This will mount the guest additions CD into the VM's optical drive.
Note: if you still see the Linux ISO in the optical drive dropdown, remove it! If you fail to remove the ISO, the VM will boot from the Live CD, not from the VM disk!
Open up a terminal and install gcc, make, perl and bzip2:
sudo apt install gcc make perl bzip2
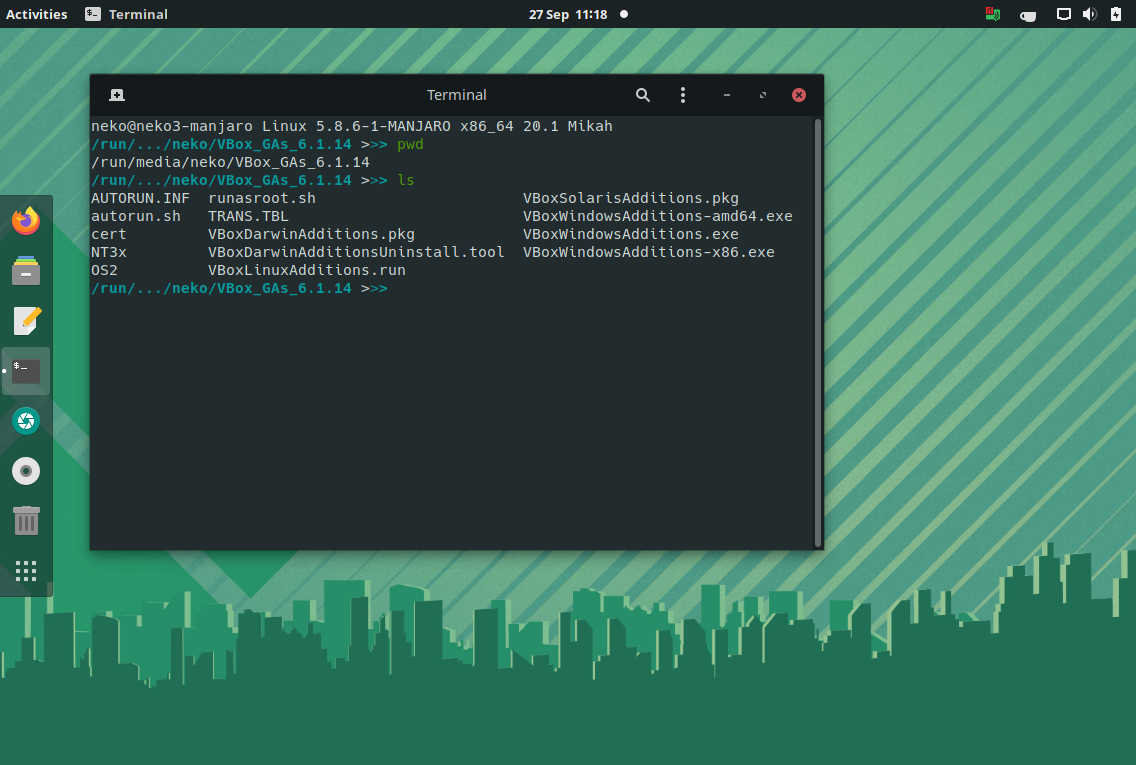
Go to the Guest Additions folder. Replace [user] with your own as needed. (Note that the GA version might have changed meanwhile)
cd /media/[user]/VBox_GAs_7.2.2
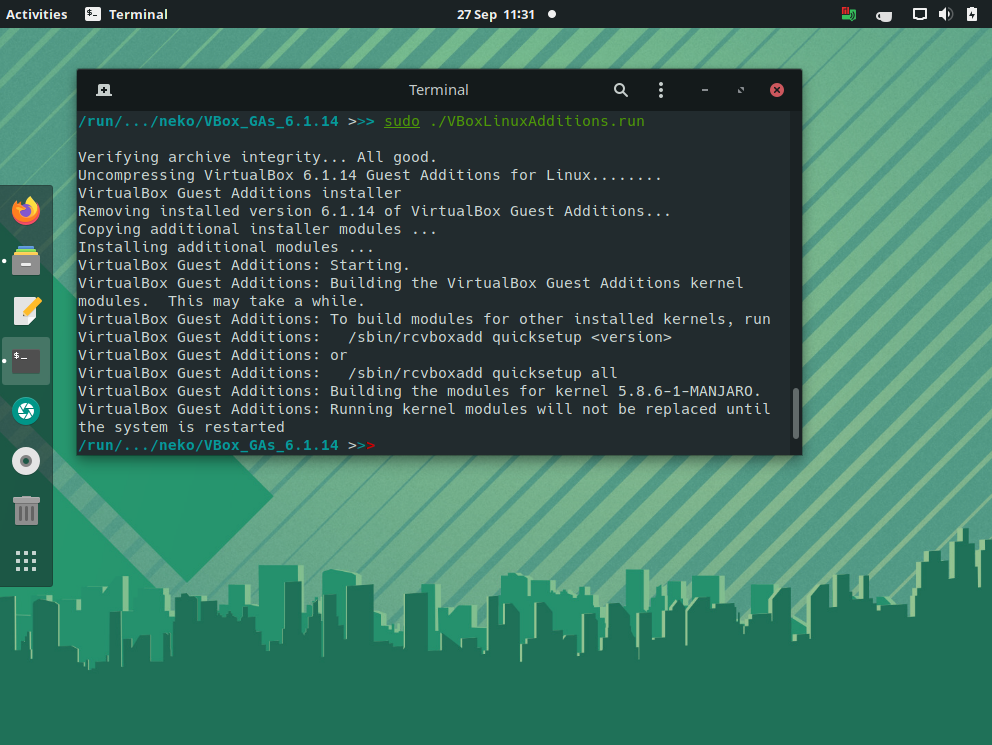
Run the Linux GA:
sudo ./VBoxLinuxAdditions.run
Provide your user password and confirm you want to install by typing yes. It will then finish.
Next, let's make sure to add our used to the vboxsf group, such that we can do shared folders (replace neko with your own username).
sudo usermod -a -G vboxsf neko
Reboot! (You can optionally now remove the Guest Additions ISO from Settings -> Storage)
Bi-directional clipboard
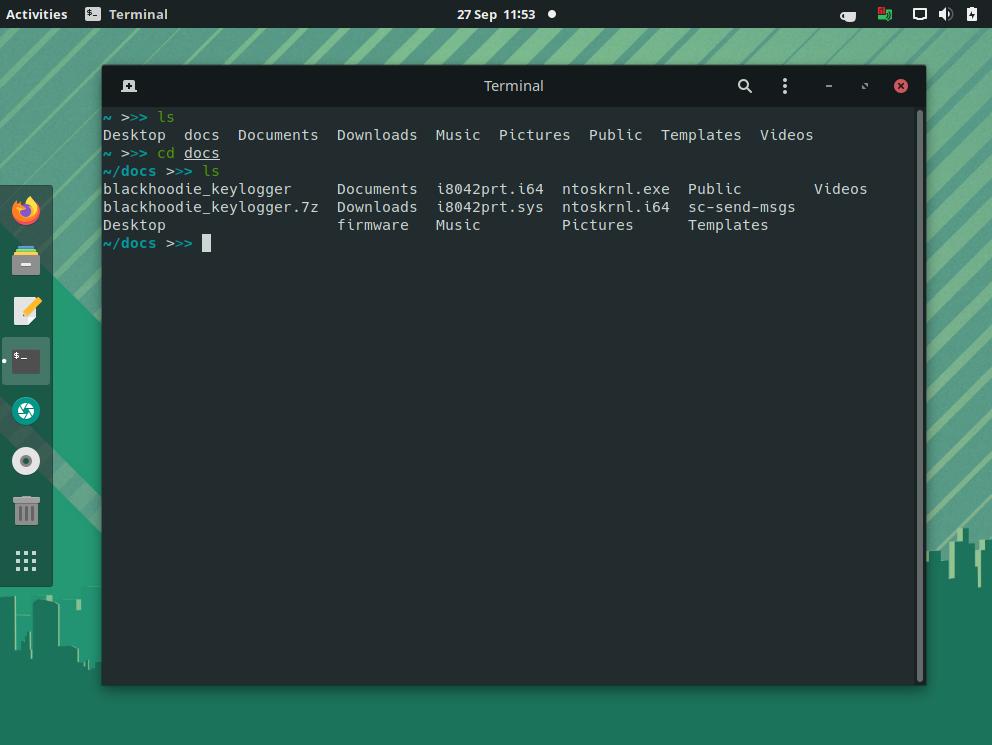
It's very useful to be able to copy between the guest VM and the host. I usually use the browser on my host machine, and often times I find myself copying stuff from the host to the VM. In order to enable the clipboard, just do to Devices -> Shared Clipboard and choose which one suits you best. I always go for Bidirectional :-) All done, it should just work now!
Shared folders
It's also super useful to have a shared folder between your VM and host. This means you don't have to copy across text or files, they can be seen by both the VM and the host!
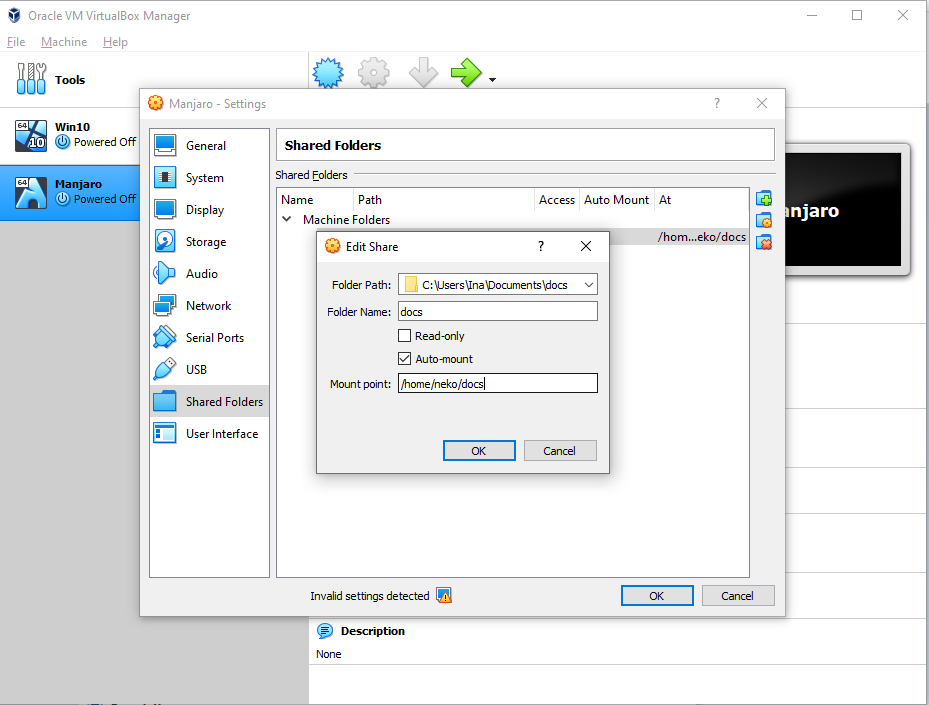
In order to setup a shared folder, we'll start with the VM powered off. Now
go to Settings -> Shared Folders. Click the folder with plus icon on the
right hand side. For the Folder Path box, click the dropdown button ->
Other... and navigate to the folder you want to share! In my case, I'll share
a folder called docs in my Documents. You can leave the Folder Name as it
defaults to, or you can give it a different name. This is how the folder
will be named in the VM! You can also make it auto-mount, and give it the
path in the VM it will appear under. Remember, in Linux, your home
directory is always /home/[your username]. In my case, I chose to mount
under the docs directory my home directory. Click Ok until you exit
Settings. Now start your VM!
Now you should see your shared folder in your home directory! Congrats!
Enjoy your new Ubuntu VM!
Now head over to the Post Installation guide to update your system and install some useful software!
Installing Windows Subsystem for Linux (WSL) and Ubuntu
Step 1 - Enable virtualisation in BIOS
WSL is a Linux virtual machine running on top of your Windows install so you need to make sure you have virtualisation enabled just like if you were installing a full virtual machine.
Make sure to read the instructions on how to do this on the virtual machine preinstall page. You can safely ignore installing VirtualBox though as WSL doesn't need that.
Step 2 - Install WSL
Installing WSL used to be a bit of a hassle to install but in more recent times it has become super easy! Just one command!
The default distribution for WSL is Ubuntu which is what we are focussing on in this guide. But if you wanted to use another distro, you can add -d <Distro name> on the end of the install command.
- Open command prompt as administrator
- Press the Windows key and search for "command prompt".
- Click "Run as administrator" in the menu.

- Run the WSL install command
wsl --install
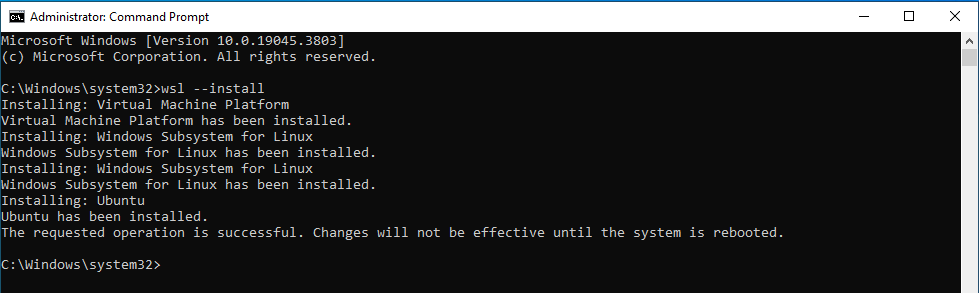
Once the install is done make sure to restart your computer and then you should be able to launch your new Windows Subsystem for Linux.
There are few ways to boot WSL but these are the easiest
- Launch from the Windows menu
- Press the Windows key and search for 'Ubuntu'.
- Launch from command prompt
- Open a command prompt window like before and type
wslorubuntuand hit enter.
- Open a command prompt window like before and type
Don't worry if it takes a while to launch for the first time, it should be nice and speedy after that.
Step 3 - Set up your Linux user
Before you can use you WSL you need to set your username and password for this Linux installation.
- This account will auto sign in when you launch WSL.
- This will be your Linux admin (sudo) account.
- You will need this password when you are installing or updating anything in WSL.
- Make sure to set a strong password that you will remember!
IMPORTANT: You will NOT see your password as you are typing it in, so don't think that it is not working if you see nothing happening, this is just a feature of UNIX.
Step 4 - Congratulations!
Good job! You've successfully set up WSL and now you can do all your Linux-y things in the comfort of your Windows install.
Check out the post-install guide to get anything else you need. Though keep in mind most of this doesn't apply to WSL.
Installing Linux on Apple Silicon
This guide will help you install Linux on newer Apple hardware that uses an Apple Silicon (ARM) CPU.
The Apple Silicon processors have very impressive performance for their energy consumption; no need for fans, all day battery life, great speed etc...but as they don't use the same CPU architecture as most desktop/laptop computers, a bit of extra work is required to get Linux working on them.
The main thing to keep in mind is that there's a difference between virtualization (running another OS designed for the same CPU architecture) and emulation (running an OS designed for a different CPU architecture).
Table of Contents
Installation methods
Bare Metal (NOT RECOMMENDED)
With incredible technical prowess, the team over at Asahi Linux have gotten Linux to run on Apple Silicon hardware. However, though it's technically possible to run Linux 'bare metal', Asahi does not represent a complete 'daily driver' setup suitable for beginners and thus we don't recommend it at this time.
If you're curious about what's currently working, check out their device support.
Dual Boot (NOT RECOMMENDED)
Because Asahi isn't quite suitable yet, this option is not really viable either.
Virtual Machine (VM) (RECOMMENDED)
The remaining option, running Linux in a VM, is our recommendation.
The options are
- VirtualBox Beta (Still in testing, emulates x86, not yet recommended)
- Parallels Desktop (non-free, though there's a free trial available)
- UTM (donationware, recommended)
Setting up a Linux VM with UTM
Prep
- Download the install media (an .iso file) from here (Note: this might take 20-30 minutes! Best to download ahead of time!) or grab one of the USB keys floating around that has the .isos on them.
- You should also download the UTM app from here and then install it as any other Mac app.
- We're going to install Ubuntu in 'server' mode and then install a desktop environment at the end to make it graphical. Just follow the steps!
UTM setup
- Open UTM and click the “+” button to open the VM creation wizard.
- Select “Virtualize”.
- Select “Linux”.
- Click “Browse” and select the Ubuntu Server ISO downloaded from the link above. Press “Continue” to continue.
- Pick the amount of RAM (recommended: 4096MB) and CPU cores (recommended: default) you wish to give access to the VM. Don't Enable Hardware OpenGL acceleration. Press “Continue” to continue.
- Specify the maximum amount of drive space to allocate (recommended: more is better, 16 GB minimum). Press “Continue” to continue.
- If you have a directory you want to mount in the VM, you can select it here. Alternatively, you can skip this and select the directory later from the VM window’s toolbar. The shared directory will be available after installing SPICE tools (see below). Press “Continue” to continue.
- Press “Save” to create the VM and press the Run (play) button to start the VM.
- Go through the Ubuntu installer.
Ubuntu Installer
You can mostly accept the defaults the installer offers without any problems. Remember you can use the tab key to move between menu items. Here are the steps:
- Hit enter on 'Try or Install Ubuntu Server'
- Wait for a bit until 'display output is not active' clears
- Choose language
- Select 'continue without updating' on the 'installer updates' page.
- Choose the keyboard configuration
- For 'type of install' select the default "Ubuntu Server"
- Accept the defaults for network connections
- No proxy -- leave blank.
- Wait for a second but then accept the default mirrors once they load.
- On the guided storage configuration, accept the defaults by tabbing to "done" and hitting enter.
- Accept the Stroage Configuration summary.
- Confirm the destructive action of wiping the contents of the virtual drive that's been created.
- Enter your name, username and user password for logging into the machine.
- Skip upgrade to 'ubuntu pro' (the default).
- Don't install the openSSH server for now (the default).
- Don't install any server snaps (the default).
- The installation will now start and takes 5-10 minutes! Wait a bit!
- Eventually "Reboot Now" will appear at the bottom. Hit enter
- ...This reboot will fail however so after 30 seconds of black screen you should manually close the VM's window, unmount the installer ISO, and start the VM again to boot into your new installation.
Post-install: Installing Ubuntu Desktop
After booting into your Linux setup, you will not have a graphical environment.
To upgrade to the full Ubuntu Desktop, log in and run:
sudo apt update
sudo apt install ubuntu-desktop
When the purple screen titled "Daemons using outdated libraries" pops up just tab to 'ok'.
Once it finishes, run:
sudo apt upgrade
sudo reboot
You should now reboot into a full graphical Linux setup!
Post-install: Graphical Setup Wizard
Finally, click through the graphical startup wizard:
- Ubuntu Pro: "skip for now"
- Help Improve Ubuntu: "No, don't send system info"
- Privacy: Leave disabled
Done!
Enjoy your new VM!
If you like, you can head over to the Post Installation guides to find some additional tips for software/configuration but be advised that not all of that content will be relevant to your Mac / UTM-based setup!
Here are a few other odds and ends:
IDEs
- You can install VS-Code from the snap store with
sudo snap install codium --classic
Troubleshooting
Follow the guide here
Expanding your UTM VM's storage
If you want to expand your VM's storage after installation and don't want to re-install from scratch, you can use this process to expand your disk. However it is a bit of a pain so ideally you get this right the first time!
Ubuntu 20 uses the LVM system for managing disks, volumes and partitions; while this system is a bit complicated, it does make this sort of operation fairly straightforward. For more information about LVM and resizing, see this guide.
NOTE: This process works but can be quite error prone; PLEASE PLEASE PLEASE make a backup as explained in step 4!
-
Setup / Information gathering
- Start your VM, run a shell and run
lsblk /dev/vdaNAME MAJ:MIN RM SIZE RO TYPE MOUNTPOINT vda 252:0 0 20G 0 disk ├─vda1 252:1 0 512M 0 part /boot/efi ├─vda2 252:2 0 1G 0 part /boot └─vda3 252:3 0 18.5G 0 part └─ubuntu--vg-ubuntu--lv 253:0 0 18.5G 0 lvm / - There are three important parts of this output:
- The 2nd line (vda) is the size of the 'virtual' disk.
- It is 20GB, the size of the virtual disk from when the VM was initially set up.
- The 5th line (vda3) is the size of the LVM VG or Volume Group
- It is 18.5G, most of the 20GB disk.
- The 6th line (ubuntu--vg-ubunut--lv) is the size of the LVM LG or Logical Volume.
- It occupies the full 18.5GB of the VG.
- The 2nd line (vda) is the size of the 'virtual' disk.
- We're going to need to resize all three one after another before we can expand our filesystem to take advantage of the space.
- Now power down your VM; This is very important!
- Start your VM, run a shell and run
-
Install
qemuon your Mac- Under the hood, UTM is a nice GUI around the open source qemu emulator/virtualizer.
- On your Mac, install the homebrew package manager.
- Using homebrew, install the qemu tools suite with
brew install qemu
-
Find your VM's data:
- Right-click on your vm in the UTM sidebar and click
Show in Finder - Quit UTM
- In the finder window that pops up, find
<VM NAME>.utm. This 'file' is really a bundle. - Right-click the file and select "Show Package Contents" to go inside the bundle.
- Right-click on your vm in the UTM sidebar and click
-
Make a backup
- Within the images directory, you'll see a
qcow2file that is your VM's virtual hard disk. - IMPORTANT: Make a duplicate (backup) of this file now in case the disk expansion fails.
- If your VM stops booting at any point, simply quit UTM, and replace your qcow2 disk image with a copy of the backup you just made.
- Within the images directory, you'll see a
-
Resize Part 1: Expand the disk
- On your Mac, open terminal and run
qemu-img resize $PATH +$SIZEwhere:- $PATH is the path to the qcow2 image
- $SIZE is the amount to add eg 20G
- Don't forget the plus sign!
- For example, this will add 10GB to the size of my disk:
qemu-img resize disk-0.qcow2 +10G
- Note that this won't change the size of the qcow2 file from macOS' perspective.
- You're now done on the Mac; all subsquent commands should be run in the VM.
- Relaunch UTM, boot up your VM, open a shell and rerun
lsblk /dev/vda:NAME MAJ:MIN RM SIZE RO TYPE MOUNTPOINT vda 252:0 0 30G 0 disk ├─vda1 252:1 0 512M 0 part /boot/efi ├─vda2 252:2 0 1G 0 part /boot └─vda3 252:3 0 18.5G 0 part └─ubuntu--vg-ubuntu--lv 253:0 0 18.5G 0 lvm / - This should confirm the larger size of the vda disk (20GB --> 30GB); however our vda3 VG and our LV have not changed in size.
- On your Mac, open terminal and run
-
Resize Part 2: Expand the Volume Group
- Install
gpartedwithsudo apt-get install gparted. - Run gparted with
sudo gparted. - You should get a popup message "Not all of the space available to /dev/vda..."
- Click "fix".
- Note the grey box of unallocated space to the far right of the disk visualization.
- Next, select the /dev/vda3 partition in the list, right click it and select "Resize/Move"
- In the popup, slide the right edge of the graphical bar at the top all the way to the right to expand the partition to use that space and hit "Resize".
- There may be a small amount of unallocated space left after this; don't worry!
- Hit the green checkmark icon to apply the changes; in the popup, click apply to confirm.
- After this completes, rerun
lsblk /dev/vda:NAME MAJ:MIN RM SIZE RO TYPE MOUNTPOINT vda 252:0 0 30G 0 disk ├─vda1 252:1 0 512M 0 part /boot/efi ├─vda2 252:2 0 1G 0 part /boot └─vda3 252:3 0 28.5G 0 part └─ubuntu--vg-ubuntu--lv 253:0 0 18.5G 0 lvm / - Now we can see that the vda3 partition has been expanded however our Logical Volume is still 18.5GB.
- Install
-
Resize Part 3: Expand the Logical Volume
- We now can grow our logical volume (LV) to fill the full volume group
- This should be as simple as
sudo lvextend -L+10G /dev/ubuntu-vg/ubuntu-lv- Note that the size (eg: the 10G on the line above) must match the size you expanded your disk image by in step 5.
- Confirm the resize:
NAME MAJ:MIN RM SIZE RO TYPE MOUNTPOINT vda 252:0 0 30G 0 disk ├─vda1 252:1 0 512M 0 part /boot/efi ├─vda2 252:2 0 1G 0 part /boot └─vda3 252:3 0 28.5G 0 part └─ubuntu--vg-ubuntu--lv 253:0 0 28.5G 0 lvm / - Looking good!
-
Resize Part 4: Expand the filesystem
- The final step -- now that we've created extra space in our logical volume, we need to expand our filesystem to use that space.
- Run
df -hto get information on how much space is available for each filesystem. - For the default ext4 fs, the
resize2fscommand allows you to expand the allocation:sudo resize2fs /dev/ubuntu-vg/ubuntu-lv
- re-run
df -hto confirm the new space; hopefully the filesystem has grown!
-
Reboot, for good measure!
- Does the VM boot?
- Confirm everything (
lsblk /dev/vda,df -h) look good.
Post installation
Things you might want to do after installing Linux, common software choices, etc.
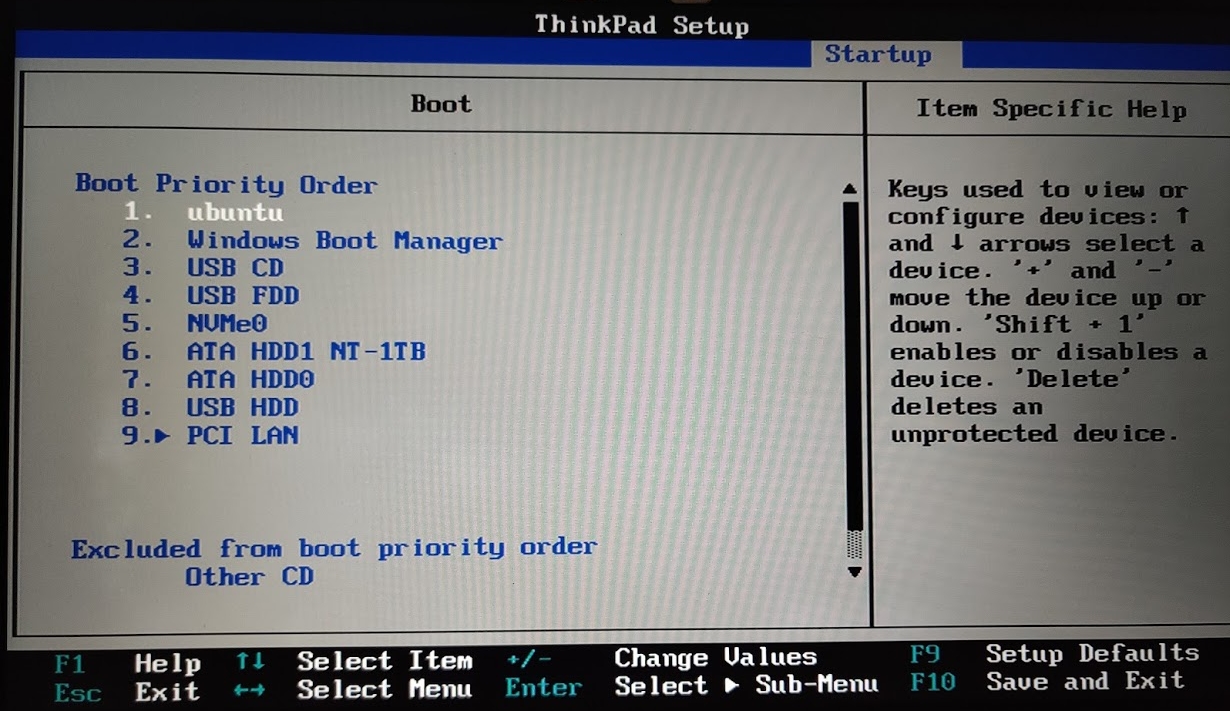
Adjusting your default boot order
Now you've installed Linux you might find that it boots straight into Windows without giving you a chance to select Linux. If this is the case, read on. Otherwise skip this section.
If you've dualbooted you'll now have two possible partitions to boot into at startup: Windows or Linux, as well as USB etc.
Importantly: if the BIOS boots into Windows it'll startup Windows straight away, but if you set it to boot to Linux it will actually go to GRUB from which you can select your OS.
So restart your device, press the key to enter BIOS and go back to the "Boot Order" menu. Move Linux to the top and Windows to second place. You can safely remove the installation media now. The order should now look something like this:
Then when it boots from now you will end up in a menu such as:
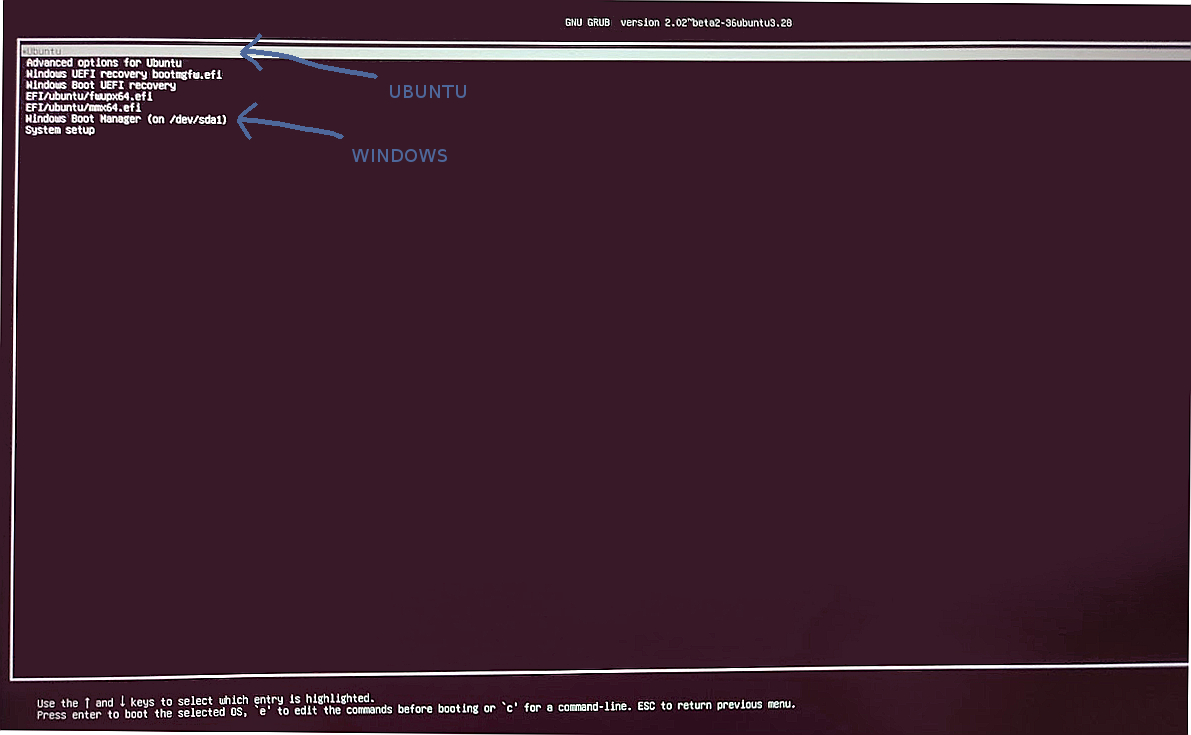
See how you can now choose between Linux and Windows every time you boot.
Bitlocker
If you disabled Bitlocker earlier, you probably want to re-secure your Windows install by re-enabling Bitlocker. Visit the Bitlocker page again and follow the instructions to enable. Again, encrypting the drive is likely to take a while.
Nvidia drivers
Nvidia drivers may be needed to gain full performance, or screen resolution, on machines with Nvidia GPUs.
Open the "Additional Drivers" application, and then install the Nvidia driver.
Secure boot and laptop considerations
Reboot your machine after the installation. If your drivers do not load, you may need to review your secure boot key enrolment (or disable secure boot).
Firewalling
Linux doesn't come with any preinstalled firewalls, this means devices on a shared network might be able to access any webservers you accidentally leave running, as well as SSH. SSH is probably the one listening service that will run by default on a Linux server and if you have poor passwords this is a risk. Note that desktop Linux installs generally do not run an SSH server out of the box.
So it's a good idea to install a super simple firewall that just stops anything connecting to your machine, don't worry it won't stop outgoing connections, just incoming attempts.
Follow the short UFW guide to get this set up.
Customise GRUB (Advanced)
For a personal touch, you can customise the bootloader you see for choosing the OS.
Gnome-look.org has a lot of nice themes. Don't ask us how to do this, you'll have to learn it on your own! We're just giving you ideas. Google is your friend :-)
Updating
You should keep your system up-to-date, and try and run updates every so often. Updates aren't as naggy as in Windows, so you may find yourself needing to remember to install them.
Notice: Make sure to be connected to an active internet connection, and *prepare for the command to take a while to finish executing.
sudo apt update && sudo apt upgrade
Installing software
sudo apt install <package>
Note: you may see both apt and apt-get around. apt is the new form of apt-get and should be preferred in general (though not for scripts).
Change your default shell
Lots of us tend to prefer zsh over bash. It's faster, more customizable, and usually has fewer pain points.
To install it:
sudo apt install zsh
Then:
chsh -s /bin/zsh
Theming
One of the best things about using Linux is the awesome levels of customisability!
How you customize the look and feel depends on what desktop environment you've chosen, for Ubuntu, it's most likely GNOME.
Check out the settings menus in both!
GNOME
For GNOME, you can install GNOME Tweak Tool to be able to change themes:
sudo apt install gnome-tweak-tool
Useful packages
- Chromium Web Browser - Chromium is an open-source web browser.
- Java Development Kit (JDK) - Java is a general-purpose programming language that is taught in first year Computer Science at UoB. Many programs we will use during AFNOM also require it.
- Neofetch - Neofetch is a command that lists information about your Linux distribution and the machine you are running on.
UFW
UFW means Uncomplicated FireWall and don't worry, it is uncomplicated. With UFW you simply describe firewall rules in the simplest possible way and it applies them, permanently. By default it applies to all protocols and interfaces, you can be more specific but the default is the safest, this means it protects you via wifi, ethernet and over VPNs (it doesn't affect the local interface however).
Installation
sudo apt install ufw
Checking the status
To see what firewall rules you have running run the command:
sudo ufw status verbose
It will tell you it's inactive for now.
To permanently activate the firewall run:
sudo ufw enable
Check the status again and it should be running.
Basic "Deny all" Rule
The simplest security model here is simply to deny every incoming connection attempt. Unless you have a very good reason for why you / someone else needs to be able to connect to your laptop remotely over a local network this will be fine.
So all we're going to do is write a single rule that sets the default to do this:
sudo ufw default deny incoming
Now any connection attempts to your ports will be rejected.
Adding exceptions
In special circumstances you might want to allow specific services to be reached throught the firewall, for example maybe you want someone to test a server running on your laptop.
Here you simply add a rule on top of the default that says "allow connections for this port number", and now you've got a nice precise hole in your firewall.
So to do this you can run the command:
sudo ufw allow in <PORT NUMBER>/tcp
You can switch TCP for UDP if that's what you need.
It's good practice to disable tis after you stop needing it, in case in the future you run something less secure on the same port and forget to reenable the firewall.
To do this you can simply run the same command as above but with the delete keyword after ufw: this will tell UFW to delete the rule described.
sudo ufw delete allow in <PORT NUMBER>/tcp
Finally and Further Reading
Now you're good to go! Remember to check the status after each new rule just to check that it did what you want.
This is a good guide to UFW: it goes over many of the same steps but some others as well if you're interested: DigitalOcean UFW Guide
And remember man ufw is your friend and will help you out with how to write complicated commands.
Chromium
Chromium is an open-source web browser.
Installation
sudo apt install chromium-browser
Running
You can either run Chromium by searching it in the applications menu (by pressing the Super (Windows) key and typing Chromium), or by running the following command:
chromium
Removal
sudo apt remove chromium-browser
Connecting to Eduroam
This guide will help you get the eduroam connection working. It assumes you are using NetworkManager for handing your network connections (which if you've been following our install guides, should be true).
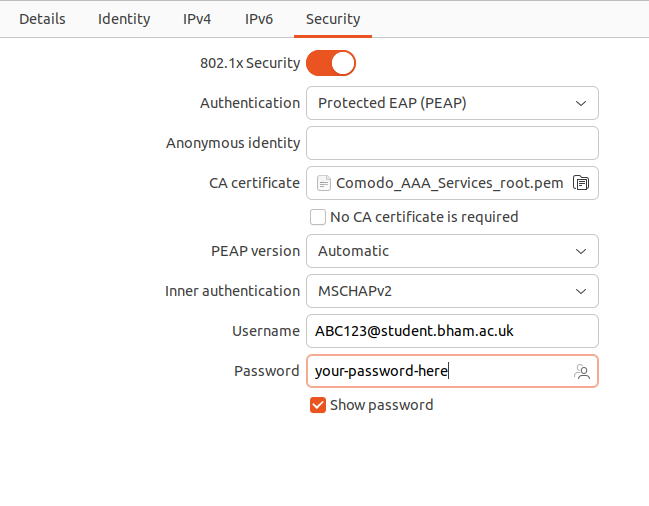
GUI Setup
Both GNOME and KDE will allow you to set up eduroam entirely with the built in network management GUI
You need to configure the following in the security tab of the network manager
- Enable 802.1x security
- Set the authentication mode to PEAP (Protected EAP)
- When prompted for the CA certificate, it is located at
/etc/ssl/certs/USERTrust_RSA_Certification_Authority.pem- You may need to click on "Other Locations" or "Root" to see the
etcfolder
- You may need to click on "Other Locations" or "Root" to see the
- Set the inner authentication to
MSCHAPv2 - If requested, set the domain to
bham.ac.uk(the option to set the domain may not exist, ignore this step if it's not there) - Set the username to
[student username]@student.bham.ac.uk, for exampleABC123@student.bham.ac.uk - Set the password to your UoB account password
- Leave the anonymous identity blank
A completed setup may look something like this
CLI setup
If for some reason you do not want to use the network setup GUI, you may also do it manually from the command line. However, NetworkManager is quite complex and generally the setup GUI is a more reliable way to add a new network.
You will only need wget as extra software. Install it:
sudo apt install wget
From the terminal:
Download the connection configuration:
wget https://linux.afnom.net/files/eduroam.nmconnection
You have to edit this file. Open it with gedit:
gedit eduroam.nmconnection &
- Replace
[computer user](the whole thing,[]included!) with your username. You can find it out by runningwhoamiin the terminal. - Replace
[student username]with your UoB student username. They look something likeabc123 - Replace
[UoB password]with your UoB account password.
Save and close the window.
Copy the file in the configurations directory of Network Manager (you must use sudo):
sudo cp eduroam.nmconnection /etc/NetworkManager/system-connections
Reload Network Manager:
sudo systemctl restart NetworkManager
You should now be able to see eduroam in your WiFi list and, when in range, connect to it.
Java Development Kit (JDK)
Java is a is a general-purpose programming language that is taught in first year Computer Science at UoB. The development kit is the package you need in order to compile and run Java applications.
Notice: Java and JavaScript are two very different languages - it has as much in common as a Car and a Carpet.
When talking about Java, there are two common areas of confusion - JDK vs JRE, and Oracle JDK vs OpenJDK.
JDK stands for Java Development Kit, and allows you to both compile Java code and also run it. JRE stands for Java Runtime Environment, and only allows you to run Java programs. This guide will help you install the JDK.
OpenJDK is a free, open-source version of the Java JDK maintained by Oracle, Red Hat, Google, and some other companies. Oracle JDK is a version of the Java JDK built on top of OpenJDK, maintained solely by Oracle, under a closed-source, paid license, with some extra proprietary tweaks added. Broadly, their functionality is the same, so this guide will focus on OpenJDK (and because we like to support open source where possible :D).
Installation
First, ensure your apt cache is up to do by running the following command.
sudo apt update && sudo apt upgrade -y
Now we can install the Java JDK. Run the following command.
sudo apt install default-jdk
Running
In order to verify that Java has been installed correctly, run the following command.
java --version
This should produce the following (or similar) output if working correctly.

Removal
sudo apt remove default-jdk
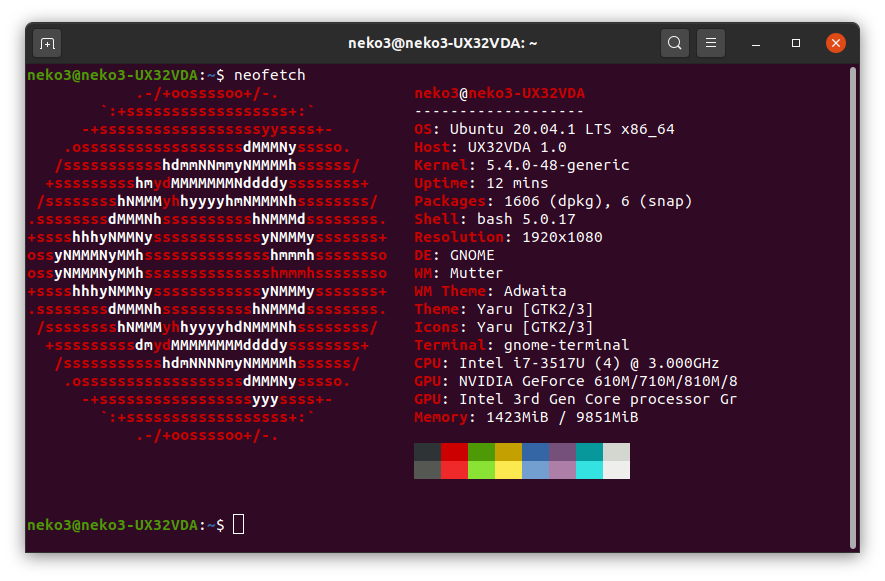
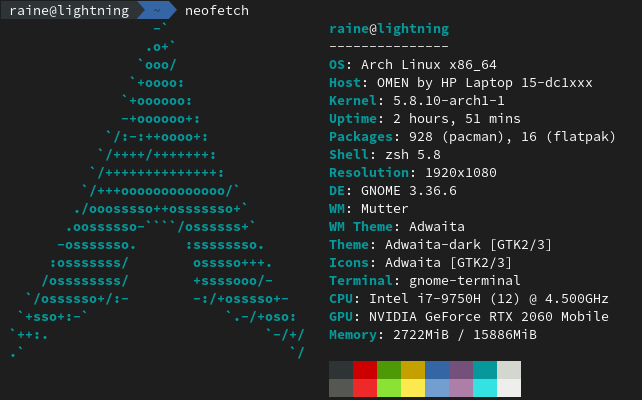
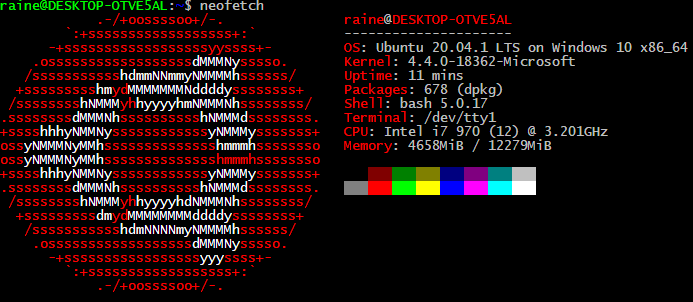
Neofetch
Neofetch is a command that lists information about your Linux distribution and the machine you are running on, it also provides an ASCII art that differs based on the flavour of Linux you are running. An alternative command to neofetch is screenfetch, which you can install and run in exactly the same way, just replacing each instance of neofetch with screenfetch in the following commands.
Installation
sudo apt install neofetch
Running
In order to run Neofetch simply execute the command via the terminal.
neofetch
Here are some example outputs, the messages will differ based on the version of Linux installed and your system's specifications.
Uninstallation
sudo apt remove neofetch
Troubleshooting
For technical questions about Linux and support after install, join the #help-and-questions channel in the AFNOM Discord.
Note that these discord servers are only available to current UoB CS students.
Learning
Now that you've gotten setup with Linux, you might want to learn a bit more about the system you're using and customize it a bit!
Special shoutout to UoB's "Missing Semester" which is a talk series members of AFNOM and CSS run which will cover a lot of this material! Please register and join us!
And of course make sure to come to AFNOM sessions too! Every wednesday 3pm-5pm, check our discord for announcements about sessions and locations.
Shell
One of the most powerful tools to get to grips with is the Linux shell. With the shell you can easily and powerfully perform many operations that are really difficult in a graphical interface. It's quite easy to get the hang of quickly, but you'll find that as long as you make an attempt to use it regularly, you'll continue to pick up skills.
Here are a few places to get started:
- FreeCodeCamp - Ultimate Linux Command Line Guide
- Very simple, easy-to-follow introduction to using the shell
- Ubuntu - The Linux command line for beginners
- Polished introduction to using the shell
- Geared towards Ubuntu, but applicable for all Linuxes
- TLDP - Bash Guide for Beginners
- TLDP has a set of excellent guides, usually very high quality
- Can tend to be a bit long-winded and cover lots of non-essential stuff
- LinuxConfig - Bash scripting tutorial
- A really good introduction to basic usage, with a focus on writing scripts
If you like interactive tutorials a bit more, then try out:
- Learn Shell
- Standard interactive tutorial to introduce you to Bash
- Very similar in style to tutorials on programming languages
- Linux Survival
- Linux command line taught as a visit to the Zoo :)
Practice
If you do some reading, you might find you might want to do some practice!
Here's a few sites you can try out:
- OverTheWire - Bandit
- One of the best wargames out there to practice learning the shell
- Comes at it from a hacking point of view 🎉
- Commandline Challenge
- Quiz-style game to test your knowledge of interactice shell usage
- Also has a really fun variant where all the programs on the system have been removed, and you have to try to perform basic operations.
However, one of the best ways to properly learn bash, is to just use it regularly. Instead of opening up a graphical UI, try and learn how to do things in the terminal. If you recognize yourself doing something repetitive, notice, and try and automate it. Read other people's shell scripts. Customize your prompt. Write your own shell even!
Essentially, just practice!
"Ricing"
There's an awesome community on /r/unixporn that is dedicated to building beautiful Linux desktops (which they call "ricing").
It's a really neat way to learn more about how to build and install lots of different pieces of software, learn some configuration, as well as discover more about display servers.
Here's some common terminology:
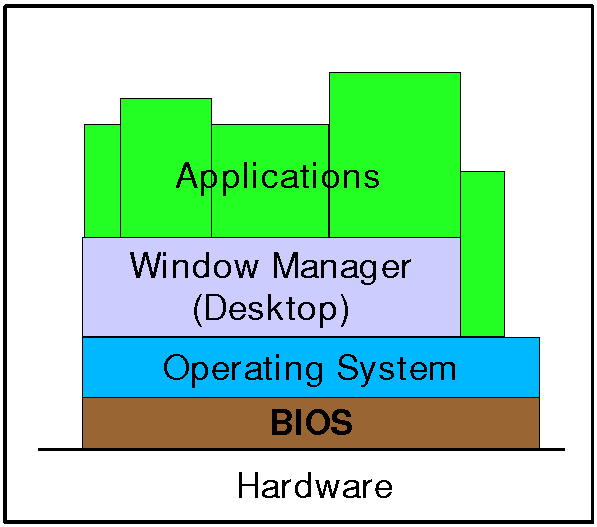
- Desktop Environment
- A full and complete set of tools that make up "a desktop"
- Usually includes a window manager, common applications, integrated settings manager, etc.
- The big ones are GNOME and KDE
- Display server
- Piece of software to display windows onto a screen
- Two choices: the older X11 and the newer Wayland
- Window manager
- Manages windows, layouts, etc
- Can be grouped into:
- Stacking, windows are stacked on top of each other, very traditional
- Tiling, windows are tiled around each other, very flexible
- Dynamic, a bit of both!
- Some window managers also include a compositor!
- Compositor
- Provide fancy effects
- Fix common issues like vsync/tearing problems
- On Wayland the compositor, window manager and display server are the same program
- Graphics toolkit
- Provides widgets, buttons, inputs
- Two main choices (but others exist), GTK or Qt