Before proceeding with installation
Please don't forget to make a backup of any important data!
Windows disk encryption/Bitlocker
Windows 10/11 Pro/Education/Enterprise Edition
If you have Windows 10 or 11 Pro, Education, or Enterprise Edition, then you should have Bitlocker on your device. This is Windows' built-in drive encryption tool and is usually enabled by default. However, it is impossible to resize partitions when they are encrypted, so Bitlocker must be disabled before installing Linux.
To disable, go to the "Manage Bitlocker" page in Windows, and then choose "Turn off Bitlocker". You will have to wait for the drive to decrypt. This may take a long time if the drive has a lot of data on it.
Windows 10/11 Home Edition
If you have Windows 10 or 11 Home Edition, then you should have Windows Device Encryption. For the average user, this is pretty similar to Bitlocker in that it encrypts your Windows drive. This, of course, means we need to disable this if it is enabled as it is impossible to resize partitions when they are encrypted, a step necessary for installing Linux in dualboot configuration.
To disable, search "Device Encryption" in the Windows start menu, then choose to disable encryption for your device. (If you search this term and nothing shows up, please Google how to access device encryption settings on your Windows version or ask for support in the Discord as there are a myriad of ways of accessing this setting that all seem to work with varying success).
What is the BIOS and why do we care?
The BIOS is the part of your computer responsible for managing hardware and booting other operating systems.
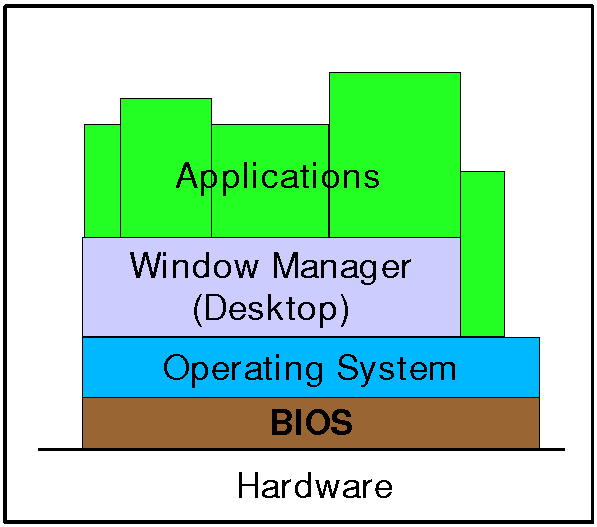
The BIOS is where we configure some of the lowest level hardware to make sure it's compatible before we mess around with our operating systems, so we're going to need to interact with it when preparing to dual boot.
Since the vast majority of laptops come with Windows preinstalled, their BIOSs are often preconfigured with settings developed explicitly for Windows. Therefore when dual booting some if these settings can be incompatible with installing Linux and we need to tweak them.
How to access the BIOS
The BIOS is only really accessible when you boot your PC so you can't adjust its settings while running an OS. You're going to have to restart your device. There are 2 ways to access the BIOS: you can trigger it from Windows OR restart your computer and enter manually.
The way its entered manually is a bit manufacturer specific in terms of which key to press whereas the Windows method is longer but more standardised.
From Windows:
1: Open Settings
2: Go to Update & Security
3: Open the Recovery tab
4: Under "Advanced Settings" restart your device using the Restart Now button
5: When your device restarts and you're presented with a menu select Troubleshoot
6: Select Advanced Options
7: Select UEFI Firmware settings
8: Click Restart
Your device will now restart and take you straight to the BIOS.
Manually:
Restart your device. Before you enter Windows you will see an icon of your laptop manufacturer e.g Lenovo, Dell etc.
At this screen press the F1 key and you should be brought to the BIOS.
If not don't worry it's just that the manufacturer has changed the button to press.
There might also be a message, for example Lenovo shows: "To interrupt normal startup press Enter". Press the key it says and you should be brought to a menu with several options, one of which will either say "adjust BIOS settings" or something similar, use the arrow keys to select this and press Enter.
How to do stuff in the BIOS
The BIOS is very low level, hence why it looks simple and works simply. You can move around the menu with the arrow keys, maybe the Tab key and selecting submenus using the Enter key, and perhaps readjusting the ordering using the +/- keys.
Hopefully it will have a handy guide of which keys do what, but if in doubt Google how to navigate your manufacturer's BIOS.
It's a bit difficult to give a general guide since the BIOS is specific to every manufacturer's motherboard but it will have all the settings you need somewhere and hopefully organised fairly logically.
In general they have several tabs, each with a different category of settings; you use the arrow keys to move selection and the Enter key to change things. There will probably be a BOOT/Startup tab that's important to us.
It's important that you make sure to SAVE the settings before leaving the BIOS, make sure when you exit you select whichever option is "Save and Exit" not just "Exit". Otherwise, guess what, all the changes you made won't stick.
Here are a few common things you should configure in the BIOS before going ahead:
Boot order
Boot order is very important to actually be able to boot to the installation media, like a USB!
By default, the system will try and boot off the first hard drive/solid state drive available, however, modern computers can boot off of many different media types, including network, cd drives, usb drives, etc.
In your BIOS, locate a section for "Boot Order", and rearrange them to place USB at the very top, before any other method. It's possible that your BIOS doesn't have this setting - which is very sad. If it doesn't, then when you try to boot your installation media, you need to interrupt the boot process and manually select the USB drive.
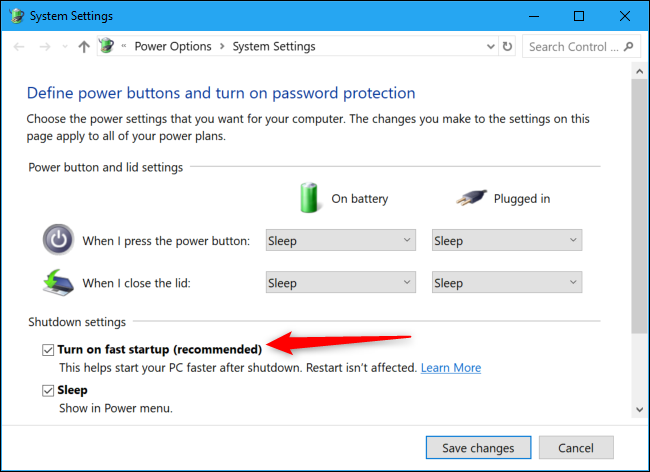
Fast Boot
Fast Boot is a Windows-only technology that enables faster booting where instead of "properly" shutting down, the computer enters a state similar to hibernation which allows faster loading of the Windows kernel and drivers. Disabling Fast Boot will make your Windows boot times slightly slower, but probably only by a few seconds at worst. In some cases having it on may cause problems accessing your Windows partition from Linux, or problems booting Linux altogether. If so you can disable it.
To disable it, first disable fast startup in Windows, and perform a full shutdown before rebooting into the BIOS. Then disable it in the BIOS.
Then, you can set Fast Boot to Disabled, usually found under the BOOT tab.
Intel RST
You may or may not need to do this step. Please read the following paragraphs to understand what RST is and to learn how to identify whether you will need it.
Intel Rapid Storage Technology can generally speed up your system and make it feel more responsive, however, because of a lack of drivers on Linux, it's quite common that your installer will not detect your hard drive if you have it enabled.
You can disable it, usually, by modifying your hard drive to use plain AHCI instead of Intel Optane in the "Devices" section of the BIOS. However, before you do this, be aware that you may take a small performance impact and notice your hard drive speeds a bit slower than before. Also, note that if you're planning on keeping Windows around, you'll need to do some prep before making the change.
The Ubuntu installer will prompt you if changes to Intel RST are required. It's easy to determine as you won't see your disk in the installer list, when you reach the partitioning step in the guide. If this happens, come back here and follow the guide below.
To avoid the chance of something going wrong, follow the guide on the Ubuntu discourse here, taking special note of the required instructions on the Windows side of things.