Installing Windows Subsystem for Linux (WSL) and Ubuntu
Step 1 - Enable virtualisation in BIOS
WSL is a Linux virtual machine running on top of your Windows install so you need to make sure you have virtualisation enabled just like if you were installing a full virtual machine.
Make sure to read the instructions on how to do this on the virtual machine preinstall page. You can safely ignore installing VirtualBox though as WSL doesn't need that.
Step 2 - Install WSL
Installing WSL used to be a bit of a hassle to install but in more recent times it has become super easy! Just one command!
The default distribution for WSL is Ubuntu which is what we are focussing on in this guide. But if you wanted to use another distro, you can add -d <Distro name> on the end of the install command.
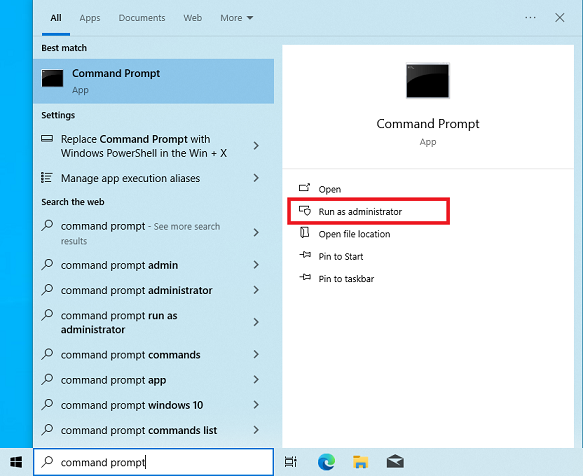
- Open command prompt as administrator
- Press the Windows key and search for "command prompt".
- Click "Run as administrator" in the menu.

- Run the WSL install command
wsl --install

Once the install is done make sure to restart your computer and then you should be able to launch your new Windows Subsystem for Linux.
There are few ways to boot WSL but these are the easiest
- Launch from the Windows menu
- Press the Windows key and search for 'Ubuntu'.
- Launch from command prompt
- Open a command prompt window like before and type
wslorubuntuand hit enter.
- Open a command prompt window like before and type
Don't worry if it takes a while to launch for the first time, it should be nice and speedy after that.
Step 3 - Set up your Linux user
Before you can use you WSL you need to set your username and password for this Linux installation.
- This account will auto sign in when you launch WSL.
- This will be your Linux admin (sudo) account.
- You will need this password when you are installing or updating anything in WSL.
- Make sure to set a strong password that you will remember!
IMPORTANT: You will NOT see your password as you are typing it in, so don't think that it is not working if you see nothing happening, this is just a feature of UNIX.
Step 4 - Congratulations!
Good job! You've successfully set up WSL and now you can do all your Linux-y things in the comfort of your Windows install.
Check out the post-install guide to get anything else you need. Though keep in mind most of this doesn't apply to WSL.